警告
本文最后更新于 2020-11-24,文中内容可能已过时。
上篇文章已经确定了使用 Quorum 区块链,本文记录搭建 Quorum 私有区块链网络的过程。值得一提的是,相比于之前区块链平台搭建的尝试,本篇所述内容已经是一个完整无冗余的方案,后续对区块链平台搭建过程的优化,更多的是根据具体情况进行取舍,以及使用新出的一些更好用的工具。
1. 设备整理
首先整理下手头现有的设备,包括开发板、MCU或其它套件、传感器/执行器等的列表如下
LoRa/GPS HAT,CC1350 LaunchPad都内置一个温度传感器,LoRa/GPS HAT除了支持LoRa通信,还可以收集并上传GPS数据
2. 设备选择与方案构思
主要考虑使用哪些设备,为了反映所设计的系统的基本结构,需要包括网关和终端IoT设备。有下面几种思路。
有线直连,树莓派/BBB + 传感器/执行器
将传感器/执行器直接接到树莓派或BBB开发板上,在开发板中使用Python相关库从传感器/执行器读取相关数据并进行处理。工作量较小
有线直连,树莓派 + Arduino + 传感器/执行器
Arduino连接传感器/执行器,并通过串口与树莓派通信,在树莓派中使用Python相关库处理Arduino传过来的数据并进行处理。工作量较小,但目前没有Arduino。
无线通信,LoRa
Arduino连接传感器/执行器,同时连接LoRa模块作为LoRa节点,将收集自传感器的数据通过LoRa模块发送到网关。树莓派连接 LoRa/GPS Hat 作为 LoRa网关接受来自LoRa节点的数据,并提交到The Things Network(TTN) 网络,从TTN后台获取实时数据供区块链处理
目前没有Arduino,且缺少一个LoRa模块与LoRa/GPS HAT协作传输数据。
这一方式工作量较大。
无线通信,Sub 1GHz
CC1350 LaunchPad作为终端设备从传感器获取数据,通过Sub 1GHz发送给另一台作为收集器的CC1350,收集器与BeagleBone Black串口通信,网关运行在BBB上。
CC1350 LaunchPad 编程处理传感器工作量比Arduino大,不熟悉;如何从运行在BBB上的本地网关获取暂时数据也不清楚
这一方式工作量较大
最后选择的方案是:使用两台树莓派,通过WiFi连接到电脑,终端 IoT 设备通过区块链账户表示,不连接实物。
3. 网络拓扑
在正式开始本实验之前,已经尝试过使用两台电脑和两台树莓派搭建 Quorum 网络,主要使用的是虚拟机,但到最后由于网络质量的问题,共识协议无法正常运行,导致合约部署无法完成。估计主要原因是 PC 上的节点装在了虚拟机里,虚拟机又使用桥接模式,导致最后丢包率和延迟都比较高。因此这次对实验做一定的调整,主要有两点:
- 撤销 laptop 的节点,只使用台式机,节点仍然安装在虚拟机中,但不使用桥接模式,而是通过外接无线网卡直接连到路由器的无线网络;
- 扩展节点数量到 6 个,虚拟机中设置 4 个验证者节点,以端口号区分,两台树莓派分别代表一个普通节点,在之后加入。
最终使用了两台树莓派和一台计算机搭建完成 6 节点的 Quorum 网络,采用了 IBFT 共识,未启用隐私管理器。网络拓扑如下:
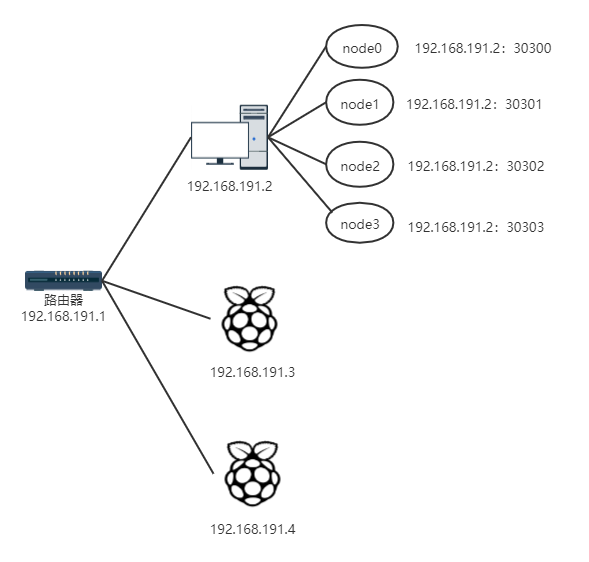
注意,当前虚拟机和树莓派都是通过无线网卡接入路由器共享的无线网络(网络名为 quorum)。
3.1 设备和操作系统选择
实验平台共使用了一台台式电脑和两台树莓派。设备和操作系统的详细信息如下,台式电脑的内存和硬盘信息是虚拟机分配的容量。
| 设备 | CPU | 操作系统 | 内存 | 硬盘 |
|---|
| 清华同方(台式电脑) | Intel Core i5-4460, 3.2GHz | Ubuntu 18.04 LTS(虚拟机) | 2GB | 50GB |
| Raspberry Pi 3 Model B Plus | quad-core ARM Cortex A53, 1.4GHz | Raspbian Buster | 1GB | 32GB(microSD card) |
| Raspberry Pi 3 Model B | quad-core ARM Cortex A53, 1.2GHz | Raspbian Buster | 1GB | 16GB(microSD card) |
3.2 静态ip分配
台式电脑的操作环境是在虚拟机上完成的,涉及到网络相关操作,这里事先对各设备进行静态ip的分配
| 设备 | 主机名 | 节点编号 | IP地址 | 操作系统 |
|---|
| 清华同方(PC) | validator | node0 | 192.168.191.2:30300 | Ubuntu 18.04 LTS |
| 清华同方(PC) | validator | node1 | 192.168.191.2:30301 | Ubuntu 18.04 LTS |
| 清华同方(PC) | validator | node2 | 192.168.191.2:30302 | Ubuntu 18.04 LTS |
| 清华同方(PC) | validator | node3 | 192.168.191.2:30303 | Ubuntu 18.04 LTS |
| Pi 3B+ | lightnode1 | node4 | 192.168.191.3 | Raspbian Buster |
| Pi 3B | lightnode2 | node5 | 192.168.191.4 | Raspbian Buster |
4. 主机设置
在 VMware 中安装 Ubuntu 18.04 虚拟机,安装完成后完成如下基础配置。
4.1 系统初始化
更新源和系统
1
2
| sudo apt-get update
sudo apt-get upgrade
|
调整系统时间
 1
 2
 3
 4
 5
 6
 7
 8
 9
10
11
| # 查看系统时区是否正确
$ timedatectl
Local time: 五 2019-09-13 11:07:13 +08
Universal time: 五 2019-09-13 03:07:13 UTC
RTC time: 五 2019-09-13 03:07:13
Time zone: Asia/Ulaanbaatar (+08, +0800)
System clock synchronized: yes
systemd-timesyncd.service active: yes
RTC in local TZ: no
# 若不正确,使用下列命令设置时区,时区根据自己所处位置调整
$ timedatectl set-timezone Asia/Shanghai
|
设置主机名
1
| sudo hostnamectl set-hostname validator
|
重启终端查看新的主机名
 1
 2
 3
 4
 5
 6
 7
 8
 9
10
| $ hostnamectl
Static hostname: validator
Icon name: computer-vm
Chassis: vm
Machine ID: fea6d1013b564af9ad3667732e5417fc
Boot ID: 326e1f8c6fd04269803413d6ac7c6167
Virtualization: vmware
Operating System: Ubuntu 18.04.3 LTS
Kernel: Linux 5.0.0-23-generic
Architecture: x86-64
|
4.2 静态ip设置
执行ifconfig命令需要安装net-tools工具
1
| sudo apt-get install net-tools
|
Ubuntu18.04 必须使用netplan管理网络,但因为这里是 Desktop 版,可以可视化设置,所以暂时不需要理解。
在设置页面选择无线网络,然后点击网络连接的 quorum 网络的小齿轮图标,进入网络设置页面
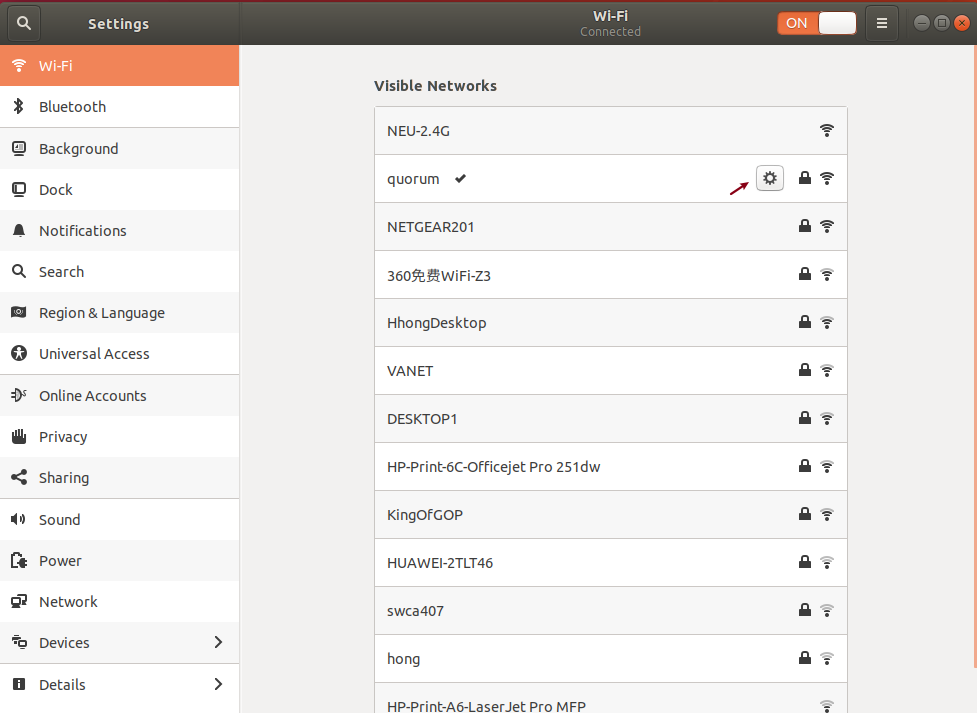
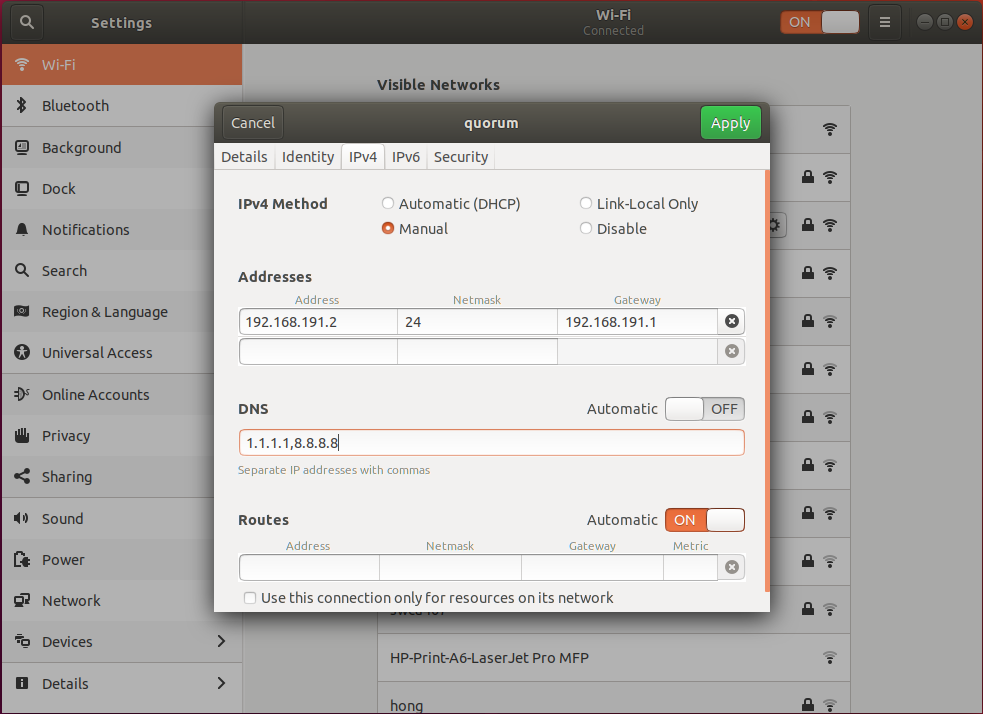
点击IPv4选项卡,选择Manual,输入我们之前预先设计的IP192.168.191.2,子网掩码、网关和DNS都做相应的设置,然后点击应用。
查看设置好的网络地址
 1
 2
 3
 4
 5
 6
 7
 8
 9
10
| $ ifconfig
...
wlxb8de5e4dad9c: flags=4163<UP,BROADCAST,RUNNING,MULTICAST> mtu 1500
inet 192.168.191.2 netmask 255.255.255.0 broadcast 192.168.191.255
inet6 fe80::bfba:dc41:82e0:e788 prefixlen 64 scopeid 0x20<link>
ether b8🇩🇪5e:4d:ad:9c txqueuelen 1000 (Ethernet)
RX packets 238 bytes 190654 (190.6 KB)
RX errors 0 dropped 1 overruns 0 frame 0
TX packets 261 bytes 36065 (36.0 KB)
TX errors 0 dropped 0 overruns 0 carrier 0 collisions 0
|
最后取消有线网络的自动连接,确保网络连接处于quorum无线网络上,不过还需要在每次虚拟机启动时手动断开网卡和主机的连接,然后连到虚拟机上。
4.3 软件编译安装
获取与安装go1.13
 1
 2
 3
 4
 5
 6
 7
 8
 9
10
11
12
13
| $ wget https://dl.google.com/go/go1.13.linux-amd64.tar.gz
$ sudo tar -xzf go1.13.linux-amd64.tar.gz -C /usr/local
$ rm go1.13.linux-amd64.tar.gz
# 设置环境变量
$ sudo nano /etc/profile
# 在打开的文件末尾添加下列语句
export PATH=$PATH:/usr/local/go/bin
# 更新的环境变量在下一次登录之前不会生效,但可以通过下面的命令使其直接生效
$ source /etc/profile
# 查看生效后的环境变量设置
$ go version
go version go1.13 linux/amd64
# 注:真正生效必须重启系统
|
安装geth for quorum
 1
 2
 3
 4
 5
 6
 7
 8
 9
10
11
12
13
14
15
16
17
18
19
| # 获取编译后的二进制包
$ wget https://bintray.com/quorumengineering/quorum/download_file?file_path=v2.2.5/geth_v2.2.5_linux_amd64.tar.gz
# 解压缩并安装
$ sudo tar -xzf download_file?file_path=v2.2.5%2Fgeth_v2.2.5_linux_amd64.tar.gz -C /usr/local/bin
$ rm download_file?file_path=v2.2.5%2Fgeth_v2.2.5_linux_amd64.tar.gz
# 测试安装
$ geth version
WARN [10-11|09:41:31.463] Sanitizing cache to Go's GC limits provided=1024 updated=655
Geth
Version: 1.8.18-stable
Git Commit: c894c2d70eacf30740d03b53ed2fb39e42641295
Quorum Version: 2.2.5
Architecture: amd64
Protocol Versions: [63 62]
Network Id: 1337
Go Version: go1.11.12
Operating System: linux
GOPATH=
GOROOT=/home/travis/.gimme/versions/go1.11.12.linux.amd64
|
获取并编译istanbul-tools,该工具用来初始化 IBFT 共识网络及进行网络测试
 1
 2
 3
 4
 5
 6
 7
 8
 9
10
| $ sudo apt-get install git
$ mkdir istanbul && cd istanbul
$ git clone https://github.com/jpmorganchase/istanbul-tools.git
$ cd istanbul-tools
# 执行编译
$ sudo apt-get install -y build-essential
$ make
# 编译后的文件位于/build/bin目录下,执行测试
$ ./build/bin/istanbul --version
istanbul version v1.0.1
|
5. 树莓派启动及配置
以 Pi 3B+ 为例,Pi 3B 配置操作基本相同
5.1 树莓派启动
将 Raspbian Buster 镜像写入准备好的 SD卡,重新加载在电脑中的 SD 卡会出现 boot 盘,同时也是树莓派的/boot目录。在 boot 盘根目录新建名为ssh的文件,开启 SSH 连接。同时新建wpa_supplicant.conf文件,编辑其内容如下:
1
2
3
4
5
6
7
8
9
| ctrl_interface=DIR=/var/run/wpa_supplicant GROUP=netdev
update_config=1
country=CN
network={
ssid="WiFi名"
psk="密码"
priority=10
}
|
将其中的 ssid 和 psk 更改为自己无线网络的网络名和密码。将配置好的 SD 卡卸载并插入树莓派,通电启动。使用 Advanced IP Scanner 扫描无线网络的网段,获取树莓派 ip,本实验无线网络网段为192.168.191.1-254。
使用扫描到的 ip 通过 Putty 利用 SSH 协议进行登录。
5.2 树莓派基本配置
A. 更新源及系统
编辑/etc/apt/sources.list文件
1
| sudo nano /etc/apt/sources.list
|
注释掉原来的源,将源更新为:
1
2
| deb http://mirrors.tuna.tsinghua.edu.cn/raspbian/raspbian/ buster main contrib non-free rpi
deb-src http://mirrors.tuna.tsinghua.edu.cn/raspbian/raspbian/ buster main contrib non-free rpi
|
保存退出,编辑/etc/apt/sources.list.d/raspi.list文件
1
| sudo nano /etc/apt/sources.list.d/raspi.list
|
将源更新为:
1
2
| deb http://mirror.tuna.tsinghua.edu.cn/raspberrypi/ buster main ui
deb-src http://mirror.tuna.tsinghua.edu.cn/raspberrypi/ buster main ui
|
更新源文件列表,更新软件
1
2
| sudo apt-get update
sudo apt-get upgrade
|
B. 安装xrdp供远程连接
1
2
3
4
5
| $ sudo apt-get install xrdp
# 确认安装
$ dpkg -l | grep xrdp
ii xorgxrdp 1:0.2.9-1 armhf Remote Desktop Protocol (RDP) modules for X.org
ii xrdp 0.9.9-1 armhf Remote Desktop Protocol (RDP) server
|
C. 开启ftp供文件传输
安装vsftpd
1
2
3
4
| $ sudo apt-get install vsftpd
# 确认安装
$ dpkg -l | grep vsftpd
ii vsftpd 3.0.3-12 armhf lightweight, efficient FTP server written for security
|
编辑配置文件
1
| sudo nano /etc/vsftpd.conf
|
启用对树莓派的写入权限
1
2
| # Uncomment this to enable any form of FTP
write command.write_enable=YES
|
保存退出,启用vsftpd
1
| sudo service vsftpd start
|
D. 修改pi账户密码,时区和主机名
选择第一项Change User Password,键入新密码并确定,
选择第四项Localisation Options,选择Change Timezone,将时区更改为Asia/Shanghai
全部设置完成后选择Finish退出,终端将看到如下输出
1
2
3
4
5
6
7
8
| Current default time zone: 'Asia/Shanghai'
Local time is now: Fri Sep 13 18:40:56 CST 2019.
Universal Time is now: Fri Sep 13 10:40:56 UTC 2019.
New password:
Retype new password:
passwd: password updated successfully
OK
|
设置主机名
1
| sudo hostnamectl set-hostname node5
|
编辑/etc/hosts文件,将127.0.1.1对应的raspberry更改为node5
1
2
3
4
5
6
| 127.0.0.1 localhost
::1 localhost ip6-localhost ip6-loopback
ff02::1 ip6-allnodes
ff02::2 ip6-allrouters
127.0.1.1 node5
|
退出终端并使用新密码重新登录,主机名将更改为node5。注意此时用户名仍为pi。
E. 设置静态ip
编辑/etc/dhcpcd.conf文件
1
| sudo nano /etc/dhcpcd.conf
|
在末尾添加如下内容
1
2
3
4
5
| interface wlan0
static ip_address=192.168.191.3/24
static routers=192.168.191.1
static domain_name_servers=192.168.191.1
|
重启并以新的ip登录树莓派。
F. 获取并安装geth
已经交叉编译过了,这里下载的是最后生成的文件,放到了Github上。交叉编译的过程可以参考本系列文章的两篇补充说明。
1
2
3
4
| git clone -b gethonly https://github.com/shuzang/quorum-raspbian.git
cd quorum-raspbian
sudo cp geth /usr/local/bin
sudo chmod +x /usr/local/bin/geth
|
测试安装是否成功
 1
 2
 3
 4
 5
 6
 7
 8
 9
10
11
12
| $ geth version
WARN [09-13|19:51:40.051] Sanitizing cache to Go's GC limits provided=1024 updated=308
Geth
Version: 1.8.18-stable
Quorum Version: 2.2.5
Architecture: arm
Protocol Versions: [63 62]
Network Id: 1337
Go Version: go1.11.6
Operating System: linux
GOPATH=
GOROOT=/usr/lib/go-1.11
|
6. 网络搭建及测试运行
6.1 主机
各节点数据和相关文件的前期生成都在台式电脑中由 istanbul-tools 工具完成。切换到台式电脑,在 istanbul 目录下创建各节点的工作目录
1
2
| cd ~/istanbul
mkdir node0 node1 node2 node3
|
进入领导节点(这里是node0)目录,使用 istanbul-tools 工具为各节点生成文件,该命令会为所有的初始验证者节点生成 static-nodes.json, genesis.json和 nodekeys 三种文件。
1
2
| cd node0
../istanbul-tools/build/bin/istanbul setup --num 4 --nodes --quorum --save --verbose
|
将输出生成的文件信息
 1
 2
 3
 4
 5
 6
 7
 8
 9
10
11
12
13
14
15
16
17
18
19
20
21
22
23
24
25
26
27
28
29
30
31
32
33
34
35
36
37
38
39
40
41
42
43
44
45
46
47
48
49
50
51
52
53
54
55
56
57
58
59
60
61
62
63
64
65
66
67
68
69
70
71
72
73
74
75
| validators
{
"Address": "0x7fec892a867a2da2e4f1ae1646c29e40d0d7a5c6",
"Nodekey": "d698db367eeb7a43c6eb6c79213482ba6ca6f2781c03e8bc8b6d4d2b9bbfd7e5",
"NodeInfo": "enode://7117f995cdb2d79eb90bc4a575c5f82bbe4aa6ac87f966b18e2e19bd29e728ba9ca85062a6af5c188bb159641392e2ac3559712d9a31e965220659412a4a8c3e@0.0.0.0:30303?discport=0"
}
{
"Address": "0x65cc0df8e88fa0fbda0337b3e0b10be9c27325c3",
"Nodekey": "0010d6506fe219d1e0c35f481ee4bd1fc26cadb84c0510128f186e32d7be3f0f",
"NodeInfo": "enode://cb790b57310d70bfb13e417e9dc22f3b0afc0065f4c5babc2f95e3ff75e99d343547585a0b2ad6be6f0497f401e93c16dadec5a68d820cb918fa0255696940f2@0.0.0.0:30303?discport=0"
}
{
"Address": "0x786083c93b12404fd4100ec497810b5cfa0a7191",
"Nodekey": "51fbf8274352fe6d39dbe99be75b13a2a882af210e84ea16935a5b52aa68c662",
"NodeInfo": "enode://0e6118122721993e84da84416cb9752a4b5c1b0077a915eb89d0cdff00862c3f13d9edc676c583997f6d9051245ba0f5587750d09d04482774a11f6d13a1c43b@0.0.0.0:30303?discport=0"
}
{
"Address": "0x28cd575468829f98dabe99f22fd6f3f09b658700",
"Nodekey": "e2ebbcdb7a82c3cac3f0d25a14b57f21dd4a2616f6797a73ab51e8c10b522055",
"NodeInfo": "enode://8d510973b1b245cb8cec8369948080b7e5adca90730112739307096ab445182415e92967de7096c013644f4b92025c7e29db23a145040cb3b9d46831fab0e8e2@0.0.0.0:30303?discport=0"
}
static-nodes.json
[
"enode://7117f995cdb2d79eb90bc4a575c5f82bbe4aa6ac87f966b18e2e19bd29e728ba9ca85062a6af5c188bb159641392e2ac3559712d9a31e965220659412a4a8c3e@0.0.0.0:30303?discport=0",
"enode://cb790b57310d70bfb13e417e9dc22f3b0afc0065f4c5babc2f95e3ff75e99d343547585a0b2ad6be6f0497f401e93c16dadec5a68d820cb918fa0255696940f2@0.0.0.0:30303?discport=0",
"enode://0e6118122721993e84da84416cb9752a4b5c1b0077a915eb89d0cdff00862c3f13d9edc676c583997f6d9051245ba0f5587750d09d04482774a11f6d13a1c43b@0.0.0.0:30303?discport=0",
"enode://8d510973b1b245cb8cec8369948080b7e5adca90730112739307096ab445182415e92967de7096c013644f4b92025c7e29db23a145040cb3b9d46831fab0e8e2@0.0.0.0:30303?discport=0"
]
genesis.json
{
"config": {
"chainId": 10,
"homesteadBlock": 0,
"eip150Block": 0,
"eip150Hash": "0x0000000000000000000000000000000000000000000000000000000000000000",
"eip155Block": 0,
"eip158Block": 0,
"byzantiumBlock": 0,
"constantinopleBlock": 0,
"istanbul": {
"epoch": 30000,
"policy": 0
},
"txnSizeLimit": 64,
"isQuorum": true
},
"nonce": "0x0",
"timestamp": "0x5e00998d",
"extraData": "0x0000000000000000000000000000000000000000000000000000000000000000f89af854947fec892a867a2da2e4f1ae1646c29e40d0d7a5c69465cc0df8e88fa0fbda0337b3e0b10be9c27325c394786083c93b12404fd4100ec497810b5cfa0a71919428cd575468829f98dabe99f22fd6f3f09b658700b8410000000000000000000000000000000000000000000000000000000000000000000000000000000000000000000000000000000000000000000000000000000000c0",
"gasLimit": "0xe0000000",
"difficulty": "0x1",
"mixHash": "0x63746963616c2062797a616e74696e65206661756c7420746f6c6572616e6365",
"coinbase": "0x0000000000000000000000000000000000000000",
"alloc": {
"28cd575468829f98dabe99f22fd6f3f09b658700": {
"balance": "0x446c3b15f9926687d2c40534fdb564000000000000"
},
"65cc0df8e88fa0fbda0337b3e0b10be9c27325c3": {
"balance": "0x446c3b15f9926687d2c40534fdb564000000000000"
},
"786083c93b12404fd4100ec497810b5cfa0a7191": {
"balance": "0x446c3b15f9926687d2c40534fdb564000000000000"
},
"7fec892a867a2da2e4f1ae1646c29e40d0d7a5c6": {
"balance": "0x446c3b15f9926687d2c40534fdb564000000000000"
}
},
"number": "0x0",
"gasUsed": "0x0",
"parentHash": "0x0000000000000000000000000000000000000000000000000000000000000000"
}
|
查看生成的文件
1
2
3
4
5
6
7
8
| $ ls -l
total 24
drwxr-xr-x 2 shuzang shuzang 4096 Dec 23 18:40 0
drwxr-xr-x 2 shuzang shuzang 4096 Dec 23 18:40 1
drwxr-xr-x 2 shuzang shuzang 4096 Dec 23 18:40 2
drwxr-xr-x 2 shuzang shuzang 4096 Dec 23 18:40 3
-rwxr-xr-x 1 shuzang shuzang 1792 Dec 23 18:40 genesis.json
-rwxr-xr-x 1 shuzang shuzang 666 Dec 23 18:40 static-nodes.json
|
使用预定的IP和端口号为所有验证者节点更新 static-nodes.json 文件。 在 static-nodes.json中,每个节点占据一行,按节点标号顺序排列
1
2
3
4
5
6
7
8
| $ cat static-nodes.json
....更新ip和端口号如下
[
"enode://7117f995cdb2d79eb90bc4a575c5f82bbe4aa6ac87f966b18e2e19bd29e728ba9ca85062a6af5c188bb159641392e2ac3559712d9a31e965220659412a4a8c3e@192.168.191.2:30300?discport=0",
"enode://cb790b57310d70bfb13e417e9dc22f3b0afc0065f4c5babc2f95e3ff75e99d343547585a0b2ad6be6f0497f401e93c16dadec5a68d820cb918fa0255696940f2@192.168.191.2:30301?discport=0",
"enode://0e6118122721993e84da84416cb9752a4b5c1b0077a915eb89d0cdff00862c3f13d9edc676c583997f6d9051245ba0f5587750d09d04482774a11f6d13a1c43b@192.168.191.2:30302?discport=0",
"enode://8d510973b1b245cb8cec8369948080b7e5adca90730112739307096ab445182415e92967de7096c013644f4b92025c7e29db23a145040cb3b9d46831fab0e8e2@192.168.191.2:30303?discport=0"
]
|
在每个节点的工作目录创建名为data的数据目录,在data目录创建geth目录
1
2
3
4
5
| cd ..
mkdir -p node0/data/geth
mkdir -p node1/data/geth
mkdir -p node2/data/geth
mkdir -p node3/data/geth
|
挑选部分节点,在各自节点的工作目录为其生成初始账户,账户地址会显示在终端,记住为每个节点账户所设的密码
 1
 2
 3
 4
 5
 6
 7
 8
 9
10
11
12
13
14
15
16
17
18
19
20
21
22
23
24
25
26
27
28
| $ geth --datadir node0/data account new
WARN [12-23|18:45:02.029] Sanitizing cache to Go's GC limits provided=1024 updated=655
INFO [12-23|18:45:02.031] Maximum peer count ETH=25 LES=0 total=25
Your new account is locked with a password. Please give a password. Do not forget this password.
Passphrase:
Repeat passphrase:
Address: {bffe4ff0cbd0a7590fb71966d1e6bb1a4c2359e0}
$ geth --datadir node1/data account new
WARN [12-23|18:45:13.335] Sanitizing cache to Go's GC limits provided=1024 updated=655
INFO [12-23|18:45:13.337] Maximum peer count ETH=25 LES=0 total=25
Your new account is locked with a password. Please give a password. Do not forget this password.
Passphrase:
Repeat passphrase:
Address: {dfb9cd6f474188fecbaafb9335d2905f08794612}
$ geth --datadir node2/data account new
WARN [12-23|18:45:26.461] Sanitizing cache to Go's GC limits provided=1024 updated=655
INFO [12-23|18:45:26.462] Maximum peer count ETH=25 LES=0 total=25
Your new account is locked with a password. Please give a password. Do not forget this password.
Passphrase:
Repeat passphrase:
Address: {b7ce2bd1cb7232b92220f91aa44bfd48d0d4e806}
$ geth --datadir node3/data account new
WARN [12-23|18:45:35.615] Sanitizing cache to Go's GC limits provided=1024 updated=655
INFO [12-23|18:45:35.616] Maximum peer count ETH=25 LES=0 total=25
Your new account is locked with a password. Please give a password. Do not forget this password.
Passphrase:
Repeat passphrase:
Address: {174ec46a6cda172678dfebe0ed8b0c7da685c9a4}
|
为了添加账户到初始区块,使用上述产生的账户地址更新genesis.json文件的alloc字段内容。
 1
 2
 3
 4
 5
 6
 7
 8
 9
10
11
12
13
14
15
16
17
18
19
20
21
22
23
24
25
26
27
28
29
30
31
32
33
34
35
36
37
38
39
40
41
42
43
| $ cat node0/genesis.json
{
"config": {
"chainId": 10,
"homesteadBlock": 0,
"eip150Block": 0,
"eip150Hash": "0x0000000000000000000000000000000000000000000000000000000000000000",
"eip155Block": 0,
"eip158Block": 0,
"byzantiumBlock": 0,
"constantinopleBlock": 0,
"istanbul": {
"epoch": 30000,
"policy": 0
},
"txnSizeLimit": 64,
"isQuorum": true
},
"nonce": "0x0",
"timestamp": "0x5e00998d",
"extraData": "0x0000000000000000000000000000000000000000000000000000000000000000f89af854947fec892a867a2da2e4f1ae1646c29e40d0d7a5c69465cc0df8e88fa0fbda0337b3e0b10be9c27325c394786083c93b12404fd4100ec497810b5cfa0a71919428cd575468829f98dabe99f22fd6f3f09b658700b8410000000000000000000000000000000000000000000000000000000000000000000000000000000000000000000000000000000000000000000000000000000000c0",
"gasLimit": "0xe0000000",
"difficulty": "0x1",
"mixHash": "0x63746963616c2062797a616e74696e65206661756c7420746f6c6572616e6365",
"coinbase": "0x0000000000000000000000000000000000000000",
"alloc": {
"bffe4ff0cbd0a7590fb71966d1e6bb1a4c2359e0": {
"balance": "0x446c3b15f9926687d2c40534fdb564000000000000"
},
"dfb9cd6f474188fecbaafb9335d2905f08794612": {
"balance": "0x446c3b15f9926687d2c40534fdb564000000000000"
},
"b7ce2bd1cb7232b92220f91aa44bfd48d0d4e806": {
"balance": "0x446c3b15f9926687d2c40534fdb564000000000000"
},
"174ec46a6cda172678dfebe0ed8b0c7da685c9a4": {
"balance": "0x446c3b15f9926687d2c40534fdb564000000000000"
}
},
"number": "0x0",
"gasUsed": "0x0",
"parentHash": "0x0000000000000000000000000000000000000000000000000000000000000000"
}
|
将之前步骤中产生的初始化文件移动到相应节点的工作目录。这些文件现在位于领导节点的工作目录。genesis.json放到每个节点的工作目录, static-nodes.json放到每个节点的data目录。X/nodekey放到对应节点的data/geth
 1
 2
 3
 4
 5
 6
 7
 8
 9
10
11
12
13
| cp node0/genesis.json node1
cp node0/genesis.json node2
cp node0/genesis.json node3
cp node0/static-nodes.json node0/data/
cp node0/static-nodes.json node1/data/
cp node0/static-nodes.json node2/data/
cp node0/static-nodes.json node3/data/
cp node0/0/nodekey node0/data/geth
cp node0/1/nodekey node1/data/geth
cp node0/2/nodekey node2/data/geth
cp node0/3/nodekey node3/data/geth
|
分别在各自节点工作目录执行节点初始化工作
 1
 2
 3
 4
 5
 6
 7
 8
 9
10
11
12
13
14
15
16
17
18
19
20
21
22
23
24
25
26
27
28
29
30
31
32
33
34
35
36
37
38
39
40
41
42
43
44
45
46
47
48
49
50
51
52
53
| $ cd node0
$ geth --datadir data init genesis.json
WARN [12-23|18:52:30.425] Sanitizing cache to Go's GC limits provided=1024 updated=655
INFO [12-23|18:52:30.438] Maximum peer count ETH=25 LES=0 total=25
INFO [12-23|18:52:30.439] Allocated cache and file handles database=/home/shuzang/istanbul/node0/data/geth/chaindata cache=16 handles=16
INFO [12-23|18:52:30.453] Writing custom genesis block
INFO [12-23|18:52:30.455] Persisted trie from memory database nodes=5 size=819.00B time=76.952µs gcnodes=0 gcsize=0.00B gctime=0s livenodes=1 livesize=0.00B
INFO [12-23|18:52:30.456] Successfully wrote genesis state database=chaindata hash=afaace…b46039
INFO [12-23|18:52:30.456] Allocated cache and file handles database=/home/shuzang/istanbul/node0/data/geth/lightchaindata cache=16 handles=16
INFO [12-23|18:52:30.460] Writing custom genesis block
INFO [12-23|18:52:30.460] Persisted trie from memory database nodes=5 size=819.00B time=47.175µs gcnodes=0 gcsize=0.00B gctime=0s livenodes=1 livesize=0.00B
INFO [12-23|18:52:30.460] Successfully wrote genesis state database=lightchaindata hash=afaace…b46039
$ cd ../node1
$ geth --datadir data init genesis.json
WARN [12-23|18:53:24.245] Sanitizing cache to Go's GC limits provided=1024 updated=655
INFO [12-23|18:53:24.246] Maximum peer count ETH=25 LES=0 total=25
INFO [12-23|18:53:24.247] Allocated cache and file handles database=/home/shuzang/istanbul/node1/data/geth/chaindata cache=16 handles=16
INFO [12-23|18:53:24.251] Writing custom genesis block
INFO [12-23|18:53:24.252] Persisted trie from memory database nodes=5 size=819.00B time=51.433µs gcnodes=0 gcsize=0.00B gctime=0s livenodes=1 livesize=0.00B
INFO [12-23|18:53:24.252] Successfully wrote genesis state database=chaindata hash=afaace…b46039
INFO [12-23|18:53:24.252] Allocated cache and file handles database=/home/shuzang/istanbul/node1/data/geth/lightchaindata cache=16 handles=16
INFO [12-23|18:53:24.255] Writing custom genesis block
INFO [12-23|18:53:24.255] Persisted trie from memory database nodes=5 size=819.00B time=48.23µs gcnodes=0 gcsize=0.00B gctime=0s livenodes=1 livesize=0.00B
INFO [12-23|18:53:24.255] Successfully wrote genesis state database=lightchaindata hash=afaace…b46039
$ cd ../node2
$ geth --datadir data init genesis.json
WARN [12-23|18:53:52.025] Sanitizing cache to Go's GC limits provided=1024 updated=655
INFO [12-23|18:53:52.026] Maximum peer count ETH=25 LES=0 total=25
INFO [12-23|18:53:52.027] Allocated cache and file handles database=/home/shuzang/istanbul/node2/data/geth/chaindata cache=16 handles=16
INFO [12-23|18:53:52.032] Writing custom genesis block
INFO [12-23|18:53:52.032] Persisted trie from memory database nodes=5 size=819.00B time=76.54µs gcnodes=0 gcsize=0.00B gctime=0s livenodes=1 livesize=0.00B
INFO [12-23|18:53:52.032] Successfully wrote genesis state database=chaindata hash=afaace…b46039
INFO [12-23|18:53:52.032] Allocated cache and file handles database=/home/shuzang/istanbul/node2/data/geth/lightchaindata cache=16 handles=16
INFO [12-23|18:53:52.035] Writing custom genesis block
INFO [12-23|18:53:52.035] Persisted trie from memory database nodes=5 size=819.00B time=44.94µs gcnodes=0 gcsize=0.00B gctime=0s livenodes=1 livesize=0.00B
INFO [12-23|18:53:52.035] Successfully wrote genesis state database=lightchaindata hash=afaace…b46039
$ cd ../node3
$ geth --datadir data init genesis.json
WARN [12-23|18:54:13.106] Sanitizing cache to Go's GC limits provided=1024 updated=655
INFO [12-23|18:54:13.107] Maximum peer count ETH=25 LES=0 total=25
INFO [12-23|18:54:13.108] Allocated cache and file handles database=/home/shuzang/istanbul/node3/data/geth/chaindata cache=16 handles=16
INFO [12-23|18:54:13.115] Writing custom genesis block
INFO [12-23|18:54:13.122] Persisted trie from memory database nodes=5 size=819.00B time=65.787µs gcnodes=0 gcsize=0.00B gctime=0s livenodes=1 livesize=0.00B
INFO [12-23|18:54:13.123] Successfully wrote genesis state database=chaindata hash=afaace…b46039
INFO [12-23|18:54:13.123] Allocated cache and file handles database=/home/shuzang/istanbul/node3/data/geth/lightchaindata cache=16 handles=16
INFO [12-23|18:54:13.126] Writing custom genesis block
INFO [12-23|18:54:13.127] Persisted trie from memory database nodes=5 size=819.00B time=45.203µs gcnodes=0 gcsize=0.00B gctime=0s livenodes=1 livesize=0.00B
INFO [12-23|18:54:13.127] Successfully wrote genesis state database=lightchaindata hash=afaace…b46039
|
通过创建并运行脚本一次启动所有节点
 1
 2
 3
 4
 5
 6
 7
 8
 9
10
11
12
13
14
15
16
17
18
19
20
21
22
23
24
25
26
27
28
29
30
31
32
33
34
| # 当前位于node4目录下,先跳出
$ cd ..
$ nano startall.sh
.... 粘贴以下内容,使端口号符合static-nodes.json中设置的端口号
#!/bin/bash
cd node0
PRIVATE_CONFIG=ignore nohup geth --datadir data --nodiscover --istanbul.blockperiod 5 --syncmode full --mine --minerthreads 1 --verbosity 5 --networkid 10 --rpc --rpcaddr 0.0.0.0 --rpcport 22000 --rpcapi admin,db,eth,debug,miner,net,shh,txpool,personal,web3,quorum,istanbul --ws --wsorigins="*" --wsaddr 0.0.0.0 --wsport 8545 --emitcheckpoints --port 30300 2>>node.log &
cd ../node1
PRIVATE_CONFIG=ignore nohup geth --datadir data --nodiscover --istanbul.blockperiod 5 --syncmode full --mine --minerthreads 1 --verbosity 5 --networkid 10 --rpc --rpcaddr 0.0.0.0 --rpcport 22001 --rpcapi admin,db,eth,debug,miner,net,shh,txpool,personal,web3,quorum,istanbul --ws --wsorigins="*" --wsaddr 0.0.0.0 --wsport 8546 --emitcheckpoints --port 30301 2>>node.log &
cd ../node2
PRIVATE_CONFIG=ignore nohup geth --datadir data --nodiscover --istanbul.blockperiod 5 --syncmode full --mine --minerthreads 1 --verbosity 5 --networkid 10 --rpc --rpcaddr 0.0.0.0 --rpcport 22002 --rpcapi admin,db,eth,debug,miner,net,shh,txpool,personal,web3,quorum,istanbul --ws --wsorigins="*" --wsaddr 0.0.0.0 --wsport 8547 --emitcheckpoints --port 30302 2>>node.log &
cd ../node3
PRIVATE_CONFIG=ignore nohup geth --datadir data --nodiscover --istanbul.blockperiod 5 --syncmode full --mine --minerthreads 1 --verbosity 5 --networkid 10 --rpc --rpcaddr 0.0.0.0 --rpcport 22003 --rpcapi admin,db,eth,debug,miner,net,shh,txpool,personal,web3,quorum,istanbul --ws --wsorigins="*" --wsaddr 0.0.0.0 --wsport 8548 --emitcheckpoints --port 30303 2>>node.log &
$
See if the any geth nodes are running.
$ ps | grep geth
Kill geth processes
$ killall -INT geth
$
$ chmod +x startall.sh
$ ./startall.sh
$ ps
PID TTY TIME CMD
3740 pts/0 00:00:00 bash
4057 pts/0 00:00:00 geth
4058 pts/0 00:00:00 geth
4059 pts/0 00:00:00 geth
4060 pts/0 00:00:00 geth
4119 pts/0 00:00:00 ps
|
第一次启动不需要使用ps和killall命令,只有之后忘记客户端是否启动的时候才需要
6.2 树莓派
以 raspberry pi 3B+ 为例,介绍添加节点到当前网络的操作,raspberry pi 3B 操作相似。
在台式电脑中创建节点工作目录
进入工作目录,生成相关文件
 1
 2
 3
 4
 5
 6
 7
 8
 9
10
11
12
13
14
15
16
17
18
19
20
21
22
23
24
25
26
27
28
29
30
31
32
33
34
35
36
37
38
39
40
41
42
43
44
45
| $ cd node4
$ ../istanbul-tools/build/bin/istanbul setup --num 1 --verbose --quorum --save
validators
{
"Address": "0x93b770a0d6f1b4eb8a96daf8a3f1e9a2d860696c",
"Nodekey": "244857df9699fab362c80864888a497caa5d98d48cd87a9cebd12696fcb0289b",
"NodeInfo": "enode://195c4a09528db47ba3625cbb21de2c8f0f15cf1a821a95e2decd46837369e7b1d192a7108b627a3840ece306baba38ca6c11ab0dc236a3542bc56ab9204eb75e@0.0.0.0:30303?discport=0"
}
genesis.json
{
"config": {
"chainId": 10,
"homesteadBlock": 0,
"eip150Block": 0,
"eip150Hash": "0x0000000000000000000000000000000000000000000000000000000000000000",
"eip155Block": 0,
"eip158Block": 0,
"byzantiumBlock": 0,
"constantinopleBlock": 0,
"istanbul": {
"epoch": 30000,
"policy": 0
},
"txnSizeLimit": 64,
"isQuorum": true
},
"nonce": "0x0",
"timestamp": "0x5e00afc6",
"extraData": "0x0000000000000000000000000000000000000000000000000000000000000000f85ad59493b770a0d6f1b4eb8a96daf8a3f1e9a2d860696cb8410000000000000000000000000000000000000000000000000000000000000000000000000000000000000000000000000000000000000000000000000000000000c0",
"gasLimit": "0xe0000000",
"difficulty": "0x1",
"mixHash": "0x63746963616c2062797a616e74696e65206661756c7420746f6c6572616e6365",
"coinbase": "0x0000000000000000000000000000000000000000",
"alloc": {
"93b770a0d6f1b4eb8a96daf8a3f1e9a2d860696c": {
"balance": "0x446c3b15f9926687d2c40534fdb564000000000000"
}
},
"number": "0x0",
"gasUsed": "0x0",
"parentHash": "0x0000000000000000000000000000000000000000000000000000000000000000"
}
|
将产生的节点信息添加到node0目录的static-nodes.json文件,设置 IP 地址和端口号
1
2
3
4
5
6
7
| [
"enode://7117f995cdb2d79eb90bc4a575c5f82bbe4aa6ac87f966b18e2e19bd29e728ba9ca85062a6af5c188bb159641392e2ac3559712d9a31e965220659412a4a8c3e@192.168.191.2:30300?discport=0",
"enode://cb790b57310d70bfb13e417e9dc22f3b0afc0065f4c5babc2f95e3ff75e99d343547585a0b2ad6be6f0497f401e93c16dadec5a68d820cb918fa0255696940f2@192.168.191.2:30301?discport=0",
"enode://0e6118122721993e84da84416cb9752a4b5c1b0077a915eb89d0cdff00862c3f13d9edc676c583997f6d9051245ba0f5587750d09d04482774a11f6d13a1c43b@192.168.191.2:30302?discport=0",
"enode://8d510973b1b245cb8cec8369948080b7e5adca90730112739307096ab445182415e92967de7096c013644f4b92025c7e29db23a145040cb3b9d46831fab0e8e2@192.168.191.2:30303?discport=0",
"enode://195c4a09528db47ba3625cbb21de2c8f0f15cf1a821a95e2decd46837369e7b1d192a7108b627a3840ece306baba38ca6c11ab0dc236a3542bc56ab9204eb75e@192.168.191.3:30303?discport=0"
]
|
复制已运行区块链的static-nodes.json和genesis.json文件到当前节点相应目录
1
| cp ../node0/genesis.json .
|
复制新的static-nodes.json文件到所有节点的data目录
1
2
3
4
5
6
7
| mkdir -p data/geth
cp ../node0/static-nodes.json data
cd ..
cp node0/static-nodes.json node0/data
cp node0/static-nodes.json node1/data
cp node0/static-nodes.json node2/data
cp node0/static-nodes.json node3/data
|
复制之前生成的 nodekey 到新节点工作目录的geth目录
1
2
| cd node4
cp 0/nodekey data/geth
|
利用 win10 的远程桌面连接(xrdp已安装)或者 ftp 等文件(vsftpd已安装)传输协议,将 node4 整个工作目录复制到 raspberry pi 3B+ 中
生成节点账户并记录账户地址
1
2
| cd node4
geth --datadir data account new
|
初始化节点
1
| geth --datadir data init genesis.json
|
创建 start.sh 脚本用于启动节点,脚本基本内容如下
1
2
| #!/bin/bash
PRIVATE_CONFIG=ignore nohup geth --datadir data --nodiscover --istanbul.blockperiod 5 --syncmode full --verbosity 5 --networkid 10 --rpc --rpcaddr 0.0.0.0 --rpcport 22000 --rpcapi admin,db,eth,debug,miner,net,shh,txpool,personal,web3,quorum,istanbul --ws --wsorigins="*" --wsaddr 0.0.0.0 --wsport 8545 --emitcheckpoints --port 30303 2>>node.log &
|
授予 start.sh 脚本执行权限,执行该脚本
1
2
3
| .... 跳转到脚本所在目录
$ sudo chmod +x start.sh
$ ./start.sh
|
执行完后查找 geth 进程是否启动,并执行geth attach命令接入 geth 控制台
1
2
| $ ps | grep geth
16877 pts/0 00:00:01 geth
|
接下来可在任一设备的节点目录下通过 websocket 进行操作。
至此利用 Quorum 搭建私链网络完毕,用作之后的实验平台,接下来进行交易验证、合约部署和测试。


 支付宝
支付宝 微信
微信