警告
本文最后更新于 2020-11-24,文中内容可能已过时。
先声明结论:最后由于网络原因没有成功,这种在多台电脑中安装虚拟机来联网的方式是存在一定问题的,其次,本篇所述的搭建方法过于繁琐,稍有不慎需要全部从头再来,在后面的实验中我们使用了简化的搭建流程。
一. 前言
为了设计一个对物联网的访问控制方案,首先利用两台树莓派和两台计算机搭建完成了一个 Quorum 区块链实验平台,并采用了 Istanbul-BFT 共识算法,但未启用隐私管理器。之后将在该实验平台上部署编写的访问控制合约。实验平台的网络拓扑如下:
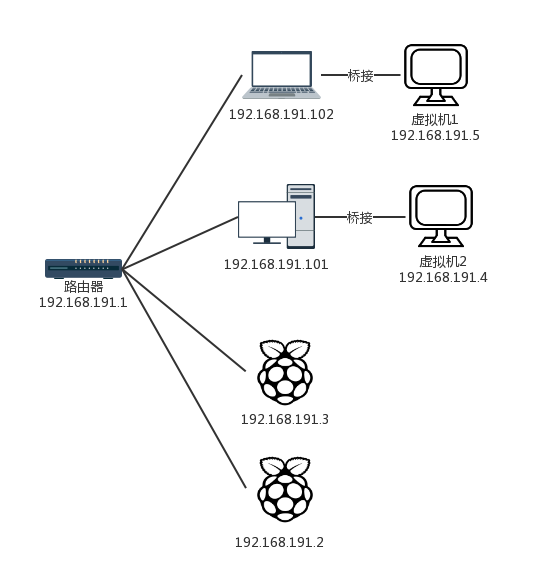
IBFT 共识允许的最小节点数量为 4,所以设置了 4 个节点,其中,两台电脑作为管理者或者用户的角色,能比较容易的和区块链交互,因为传感器和执行器本身没有足够的能力运行区块链节点,两台树莓派作为 IoT 设备的网关,我们所验证的是其中一台树莓派管理的设备向另一台树莓派管理的设备发起的访问。这里要注意两点:
- 系统中不止设备对设备的访问,一定还包括用户通过 PC 或移动设备对 IoT 设备的访问;
- 使用树莓派的原因是尽量模拟实际的环境,但事实上,树莓派依然与实际环境相差巨大,更多的是验证当前方案在资源受限的网关设备上运行的可能性及对设备造成的运行压力。
下面介绍平台的搭建过程,主要分为以下几步
- 计算机环境配置
- 树莓派启动和环境配置
- Quorum 私链网络搭建和测试运行
二. 计算机环境配置
1. 设备和操作系统选择
实验平台共使用了两台计算机和两台树莓派。设备和操作系统的详细信息如下:
| 设备 | CPU | 操作系统 | 内存 | 硬盘 |
|---|
| 清华同方 | Intel Core i5-4460, 3.2GHz | Ubuntu 18.04 LTS(虚拟机) | 2GB | 50GB |
| 华硕A550 | Intel Core i5-4200, 2.8GHz | Ubuntu 18.04 LTS(虚拟机) | 2GB | 50GB |
| Raspberry Pi 3 Model B Plus | quad-core ARM Cortex A53, 1.4GHz | Raspbian Buster | 1GB | 32GB(microSD card) |
| Raspberry Pi 3 Model B | quad-core ARM Cortex A53, 1.2GHz | Raspbian Buster | 1GB | 16GB(microSD card) |
2. 静态ip分配
两台计算机的操作环境是在虚拟机上完成的,涉及到网络相关操作,这里事先对各设备进行静态ip的分配
| 设备 | 主机名 | IP地址 | 操作系统 |
|---|
| 清华同方(PC) | NodeA | 192.168.191.2 | Ubuntu 18.04 LTS |
| 华硕(Laptop) | NodeB | 192.168.191.3 | Ubuntu 18.04 LTS |
| Pi 3B+ | NodeC | 192.168.191.4 | Raspbian Buster |
| Pi 3B | NodeD | 192.168.191.5 | Raspbian Buster |
注:以下以 PC 为例进行相关配置,Laptop 配置操作基本相同。
3. 操作系统设置
在 VM ware 中安装 Ubuntu 18.04 虚拟机,安装完成后完成如下基础配置操作:
(1) 更新源和系统
根据自己需要选择是否更换软件源,此处我使用了原生的源
1
2
| sudo apt-get update
sudo apt-get upgrade
|
(2) 调整系统时间
查看系统时区是否正确
1
2
3
4
5
6
7
8
| $ timedatectl
Local time: 五 2019-09-13 11:07:13 +08
Universal time: 五 2019-09-13 03:07:13 UTC
RTC time: 五 2019-09-13 03:07:13
Time zone: Asia/Ulaanbaatar (+08, +0800)
System clock synchronized: yes
systemd-timesyncd.service active: yes
RTC in local TZ: no
|
若不正确,使用下列命令设置时区,时区根据自己所处位置调整
1
| timedatectl set-timezone Asia/Shanghai
|
(3) 设置主机名
1
| sudo hostnamectl set-hostname NodeA
|
重启终端查看新的主机名
 1
 2
 3
 4
 5
 6
 7
 8
 9
10
| $ hostnamectl
Static hostname: NodeA
Icon name: computer-vm
Chassis: vm
Machine ID: d16107a02250422baa2e04fb10c98558
Boot ID: ea8fbdb520774a52a205281b4034f8b0
Virtualization: vmware
Operating System: Ubuntu 18.04.3 LTS
Kernel: Linux 4.15.0-20-generic
Architecture: x86-64
|
(4) 设置静态ip
安装 net-tools 工具
1
| sudo apt-get install net-tools
|
设置虚拟机网络为桥接模式,桥接到无线网卡。在/etc/netplan目录下创建配置文件
1
| sudo nano /etc/netplan/02_config.yaml
|
在配置文件中添加如下信息
 1
 2
 3
 4
 5
 6
 7
 8
 9
10
11
| network:
version: 2
renderer: networkd
ethernets:
ens33:
addresses:
- 192.168.191.2/24
gateway4: 192.168.191.1
nameservers:
search: [mydomain, otherdomain]
addresses: [1.1.1.1, 8.8.8.8]
|
ens33是网卡名,addresses下的内容为自定义的静态ip,gateway4为网关地址。保存退出,使用netplan启用设置,并查询更改后的ip地址
 1
 2
 3
 4
 5
 6
 7
 8
 9
10
11
| $ sudo netplan apply
$ ifconfig
ens33: flags=4163<UP,BROADCAST,RUNNING,MULTICAST> mtu 1500
inet 192.168.191.2 netmask 255.255.255.0 broadcast 192.168.191.255
inet6 fe80::94ff:42f8:57d5:a20f prefixlen 64 scopeid 0x20<link>
ether 00:0c:29:09:08:33 txqueuelen 1000 (以太网)
RX packets 155321 bytes 207407688 (207.4 MB)
RX errors 0 dropped 0 overruns 0 frame 0
TX packets 76320 bytes 4839627 (4.8 MB)
TX errors 0 dropped 0 overruns 0 carrier 0 collisions 0
lo: ...
|
(5) 重新安装VMware tools
只有安装 VMware tools 之后,虚拟机界面才会自动调整全屏,并且能在虚拟机和主机之间互传文件。
4. 区块链环境配置
使用的是 Quorum 区块链,共识是 Istanbul BFT。
(1) 安装golang
获取与安装 go1.13
1
2
3
| wget https://dl.google.com/go/go1.13.linux-amd64.tar.gz
sudo tar -xzf go1.13.linux-amd64.tar.gz -C /usr/local
rm go1.13.linux-amd64.tar.gz
|
设置环境变量
1
2
3
| $ sudo nano /etc/profile
# 在打开的文件末尾添加下列语句
export PATH=$PATH:/usr/local/go/bin
|
更新的环境变量在下一次登录之前不会生效,但可以通过下面的命令使其直接生效
1
2
3
4
| $ source /etc/profile
# 查看生效后的环境变量设置
$ go version
go version go1.13 linux/amd64
|
注:真正生效必须重启系统
(2) 安装geth for quorum
获取编译后的二进制包
1
| wget https://bintray.com/quorumengineering/quorum/download_file?file_path=v2.2.5/geth_v2.2.5_linux_amd64.tar.gz
|
解压缩并安装
1
2
| sudo tar -xzf download_file?file_path=v2.2.5%2Fgeth_v2.2.5_linux_amd64.tar.gz -C /usr/local/bin
rm download_file?file_path=v2.2.5%2Fgeth_v2.2.5_linux_amd64.tar.gz
|
测试安装
 1
 2
 3
 4
 5
 6
 7
 8
 9
10
11
12
13
| $ geth version
WARN [09-13|16:03:38.966] Sanitizing cache to Go's GC limits provided=1024 updated=655
Geth
Version: 1.8.18-stable
Git Commit: c894c2d70eacf30740d03b53ed2fb39e42641295
Quorum Version: 2.2.5
Architecture: amd64
Protocol Versions: [63 62]
Network Id: 1337
Go Version: go1.11.12
Operating System: linux
GOPATH=
GOROOT=/home/travis/.gimme/versions/go1.11.12.linux.amd64
|
(3) 获取并编译istanbul-tools
istanbul-tools 用来初始化 istanbul-BFT 共识网络及进行网络测试
1
2
3
4
| sudo apt-get install git
mkdir istanbul && cd istanbul
git clone https://github.com/jpmorganchase/istanbul-tools.git
cd istanbul-tools
|
执行编译
1
2
| sudo apt-get install -y build-essential
make
|
编译后的文件位于/build/bin目录下,执行测试
1
2
| $ ./build/bin/istanbul istanbul --version
istanbul version v1.0.1
|
三. 树莓派启动及环境配置
以Pi 3B+为例,Pi3B 配置操作基本相同
1. 树莓派启动
将 Raspbian Buster 镜像写入准备好的SD卡,重新加载在电脑中的SD卡会出现boot盘,同时也是树莓派的/boot目录。在boot盘根目录新建名为ssh的文件,开启SSH连接。同时新建wpa_supplicant.conf文件,编辑其内容如下:
1
2
3
4
5
6
7
8
9
| ctrl_interface=DIR=/var/run/wpa_supplicant GROUP=netdev
update_config=1
country=CN
network={
ssid="WiFi名"
psk="密码"
priority=10
}
|
将其中的ssid和psk更改为自己无线网络的网络名和密码。将配置好的SD卡卸载并插入树莓派,通电启动。使用Advanced IP Scanner扫描无线网络的网段,获取树莓派ip,本实验无线网络网段为192.168.191.1-254。
使用扫描到的ip通过Putty利用SSH协议进行登录。
2. 树莓派基本配置
(1) 更新源及系统
编辑/etc/apt/sources.list文件
1
| sudo nano /etc/apt/sources.list
|
注释掉原来的源,将源更新为:
1
2
| deb http://mirrors.tuna.tsinghua.edu.cn/raspbian/raspbian/ buster main contrib non-free rpi
deb-src http://mirrors.tuna.tsinghua.edu.cn/raspbian/raspbian/ buster main contrib non-free rpi
|
保存退出,编辑/etc/apt/sources.list.d/raspi.list文件
1
| sudo nano /etc/apt/sources.list.d/raspi.list
|
将源更新为:
1
2
| deb http://mirror.tuna.tsinghua.edu.cn/raspberrypi/ buster main ui
deb-src http://mirror.tuna.tsinghua.edu.cn/raspberrypi/ buster main ui
|
更新源文件列表,更新软件
1
2
| sudo apt-get update
sudo apt-get upgrade
|
(2) 安装xrdp供远程连接
1
| sudo apt-get install xrdp
|
(3) 开启ftp供文件传输
安装vsftpd
1
| sudo apt-get install vsftpd
|
编辑配置文件
1
| sudo nano /etc/vsftpd.conf
|
启用对树莓派的写入权限
1
2
| # Uncomment this to enable any form of FTP
write command.write_enable=YES
|
保存退出,启用vsftpd
1
| sudo service vsftpd start
|
(4) 修改pi账户密码,时区和主机名
选择第一项Change User Password,键入新密码并确定,
选择第四项Localisation Options,选择Change Timezone,将时区更改为Asia/Shanghai
全部设置完成后选择Finish退出,终端将看到如下输出
1
2
3
4
5
6
7
8
| Current default time zone: 'Asia/Shanghai'
Local time is now: Fri Sep 13 18:40:56 CST 2019.
Universal Time is now: Fri Sep 13 10:40:56 UTC 2019.
New password:
Retype new password:
passwd: password updated successfully
OK
|
设置主机名
1
| sudo hostnamectl set-hostname NodeC
|
编辑/etc/hosts文件,将127.0.1.1对应的raspberry更改为NodeC
1
2
3
4
5
6
| 127.0.0.1 localhost
::1 localhost ip6-localhost ip6-loopback
ff02::1 ip6-allnodes
ff02::2 ip6-allrouters
127.0.1.1 NodeC
|
退出终端并使用新密码重新登录,主机名将更改为NodeC。注意此时用户名仍为pi。
(5) 设置静态ip
编辑/etc/dhcpcd.conf文件
1
| sudo nano /etc/dhcpcd.conf
|
在末尾添加如下内容
1
2
3
4
5
| interface wlan0
static ip_address=192.168.191.4/24
static routers=192.168.191.1
static domain_name_servers=192.168.191.1
|
重启并以新的ip登录树莓派。
(6) 获取并安装geth
1
2
3
4
| git clone -b gethonly https://github.com/shuzang/quorum-raspbian.git
cd quorum-raspbian
sudo cp geth /usr/local/bin
sudo chmod +x /usr/local/bin/geth
|
测试安装是否成功
 1
 2
 3
 4
 5
 6
 7
 8
 9
10
11
12
| $ geth version
WARN [09-13|19:51:40.051] Sanitizing cache to Go's GC limits provided=1024 updated=308
Geth
Version: 1.8.18-stable
Quorum Version: 2.2.5
Architecture: arm
Protocol Versions: [63 62]
Network Id: 1337
Go Version: go1.11.6
Operating System: linux
GOPATH=
GOROOT=/usr/lib/go-1.11
|
四. 私链网络搭建及测试运行
各节点数据和相关文件的前期生成都在NodeA中由istanbul-tools工具完成。切换到NodeA节点的PC,在istanbul目录下创建四个节点的工作目录
1
2
| cd ~/istanbul
mkdir NodeA NodeB NodeC NodeD
|
进入领导节点(这里是NodeA)目录,使用istanbul-tools工具为四个节点生成安装玩家,该命令会为所有的初始验证者节点生成 static-nodes.json, genesis.json和 nodekeys三种文件。
1
2
| cd NodeA
../istanbul-tools/build/bin/istanbul setup --num 4 --nodes --quorum --save --verbose
|
将输出生成的文件信息
 1
 2
 3
 4
 5
 6
 7
 8
 9
10
11
12
13
14
15
16
17
18
19
20
21
22
23
24
25
26
27
28
29
30
31
32
33
34
35
36
37
38
39
40
41
42
43
44
45
46
47
48
49
50
51
52
53
54
55
56
57
58
59
60
61
62
63
64
65
66
67
68
69
70
71
72
73
74
75
76
77
| validators
{
"Address": "0x93c20b1ffa9bf8738bf194d5203e3d2e2a48428d",
"Nodekey": "6f17ec19de39281ea72a6d91d1e780bf5a0e35602f0e844e82dcc9d6a9ba7716",
"NodeInfo": "enode://faa50654f681a890c28be2faeef9211afaf1563c08ddb8990f6b39c561e002ea687707be68c16363f65c0755f785cb16e3b7be84e5e4eb260b0d4a6f6f83ef87@0.0.0.0:30303?discport=0"
}
{
"Address": "0xff75bd429c43de6719c2983c1e991b0279909559",
"Nodekey": "b7c11c512d33e3c1de97abd8a690cdbcfac9c6802a43a6ff850b244d90258908",
"NodeInfo": "enode://c286de4e89f4f209a6b32284b31829251ccb23bf5ab3bbe57ba08754392635ae755848dd6c4f367c7d92284e54e4b9f0d1a896924309380eb947e3b8c6641392@0.0.0.0:30303?discport=0"
}
{
"Address": "0xf22670e572a42729a2c10fb26f57bba46cbc3a42",
"Nodekey": "9b3740640431f0d6543f730308509fb9bc35307f826b1dd838b6812a6067f477",
"NodeInfo": "enode://cb50baa67204df2246b143e2982e40a89b2924e5c19e2834876c34042f0a81a2e2604ab210d19a048762f5355258d9840932ba868227857d928495d398c04af0@0.0.0.0:30303?discport=0"
}
{
"Address": "0x350686ae7615e87a046fc4261fe58fda3872aa65",
"Nodekey": "b6fd16bc88c8f96430b9ec0c4f6991c0f958e70026fce1abc959b295774f4e94",
"NodeInfo": "enode://214dce3278a2b45fb0bf2a1d53c24eb213c5cbb08307e842feab0202cad4f685c5c62a4197d29318f07eb813bf4189db05096b551849039bf81fb74f0211320f@0.0.0.0:30303?discport=0"
}
static-nodes.json
[
"enode://faa50654f681a890c28be2faeef9211afaf1563c08ddb8990f6b39c561e002ea687707be68c16363f65c0755f785cb16e3b7be84e5e4eb260b0d4a6f6f83ef87@0.0.0.0:30303?discport=0",
"enode://c286de4e89f4f209a6b32284b31829251ccb23bf5ab3bbe57ba08754392635ae755848dd6c4f367c7d92284e54e4b9f0d1a896924309380eb947e3b8c6641392@0.0.0.0:30303?discport=0",
"enode://cb50baa67204df2246b143e2982e40a89b2924e5c19e2834876c34042f0a81a2e2604ab210d19a048762f5355258d9840932ba868227857d928495d398c04af0@0.0.0.0:30303?discport=0",
"enode://214dce3278a2b45fb0bf2a1d53c24eb213c5cbb08307e842feab0202cad4f685c5c62a4197d29318f07eb813bf4189db05096b551849039bf81fb74f0211320f@0.0.0.0:30303?discport=0"
]
genesis.json
{
"config": {
"chainId": 10,
"homesteadBlock": 0,
"eip150Block": 0,
"eip150Hash": "0x0000000000000000000000000000000000000000000000000000000000000000",
"eip155Block": 0,
"eip158Block": 0,
"byzantiumBlock": 0,
"constantinopleBlock": 0,
"istanbul": {
"epoch": 30000,
"policy": 0
},
"txnSizeLimit": 64,
"isQuorum": true
},
"nonce": "0x0",
"timestamp": "0x5d7c4ae8",
"extraData": "0x0000000000000000000000000000000000000000000000000000000000000000f89af8549493c20b1ffa9bf8738bf194d5203e3d2e2a48428d94ff75bd429c43de6719c2983c1e991b027990955994f22670e572a42729a2c10fb26f57bba46cbc3a4294350686ae7615e87a046fc4261fe58fda3872aa65b8410000000000000000000000000000000000000000000000000000000000000000000000000000000000000000000000000000000000000000000000000000000000c0",
"gasLimit": "0xe0000000",
"difficulty": "0x1",
"mixHash": "0x63746963616c2062797a616e74696e65206661756c7420746f6c6572616e6365",
"coinbase": "0x0000000000000000000000000000000000000000",
"alloc": {
"350686ae7615e87a046fc4261fe58fda3872aa65": {
"balance": "0x446c3b15f9926687d2c40534fdb564000000000000"
},
"93c20b1ffa9bf8738bf194d5203e3d2e2a48428d": {
"balance": "0x446c3b15f9926687d2c40534fdb564000000000000"
},
"f22670e572a42729a2c10fb26f57bba46cbc3a42": {
"balance": "0x446c3b15f9926687d2c40534fdb564000000000000"
},
"ff75bd429c43de6719c2983c1e991b0279909559": {
"balance": "0x446c3b15f9926687d2c40534fdb564000000000000"
}
},
"number": "0x0",
"gasUsed": "0x0",
"parentHash": "0x0000000000000000000000000000000000000000000000000000000000000000"
}
|
查看生成的文件
1
2
3
4
5
6
7
8
| $ ls -l
total 24
drwxr-xr-x 2 shuzang shuzang 4096 Sep 14 10:05 0
drwxr-xr-x 2 shuzang shuzang 4096 Sep 14 10:05 1
drwxr-xr-x 2 shuzang shuzang 4096 Sep 14 10:05 2
drwxr-xr-x 2 shuzang shuzang 4096 Sep 14 10:05 3
-rwxr-xr-x 1 shuzang shuzang 1792 Sep 14 10:05 genesis.json
-rwxr-xr-x 1 shuzang shuzang 666 Sep 14 10:05 static-nodes.json
|
使用预定的IP(端口号不改,使用默认的30303即可)为所有验证者节点更新 static-nodes.json 文件。 在 static-nodes.json中,每个节点占据一行,第几行即代表第几个节点。
1
2
3
4
5
6
7
| $ cat static-nodes.json
....更新ip如下
[ "enode://faa50654f681a890c28be2faeef9211afaf1563c08ddb8990f6b39c561e002ea687707be68c16363f65c0755f785cb16e3b7be84e5e4eb260b0d4a6f6f83ef87@192.168.191.2:30303?discport=0",
"enode://c286de4e89f4f209a6b32284b31829251ccb23bf5ab3bbe57ba08754392635ae755848dd6c4f367c7d92284e54e4b9f0d1a896924309380eb947e3b8c6641392@192.168.191.3:30303?discport=0",
"enode://cb50baa67204df2246b143e2982e40a89b2924e5c19e2834876c34042f0a81a2e2604ab210d19a048762f5355258d9840932ba868227857d928495d398c04af0@192.168.191.4:30303?discport=0",
"enode://214dce3278a2b45fb0bf2a1d53c24eb213c5cbb08307e842feab0202cad4f685c5c62a4197d29318f07eb813bf4189db05096b551849039bf81fb74f0211320f@192.168.191.5:30303?discport=0"
]
|
在每个节点的工作目录创建名为data的数据目录,在data目录创建geth目录
1
2
3
4
5
| cd ..
mkdir -p NodeA/data/geth
mkdir -p NodeB/data/geth
mkdir -p NodeC/data/geth
mkdir -p NodeD/data/geth
|
在四个节点的工作目录中分别为各自节点生成初始账户,账户地址会显示在终端,记住为每个节点账户所设的密码
 1
 2
 3
 4
 5
 6
 7
 8
 9
10
11
12
13
14
15
16
17
18
19
20
21
22
23
24
25
26
27
28
| $ geth --datadir NodeA/data account new
WARN [09-14|10:18:26.738] Sanitizing cache to Go's GC limits provided=1024 updated=655
INFO [09-14|10:18:26.748] Maximum peer count ETH=25 LES=0 total=25
Your new account is locked with a password. Please give a password. Do not forget this password.
Passphrase:
Repeat passphrase:
Address: {b619ead9d3d72b675a471b3d8ff67673de8ae7f4}
$ geth --datadir NodeB/data account new
WARN [09-14|10:18:41.953] Sanitizing cache to Go's GC limits provided=1024 updated=655
INFO [09-14|10:18:41.954] Maximum peer count ETH=25 LES=0 total=25
Your new account is locked with a password. Please give a password. Do not forget this password.
Passphrase:
Repeat passphrase:
Address: {4cd5ae20dba37c96717f328dc6c02e1c1927be1c}
$ geth --datadir NodeC/data account new
WARN [09-14|10:18:56.231] Sanitizing cache to Go's GC limits provided=1024 updated=655
INFO [09-14|10:18:56.232] Maximum peer count ETH=25 LES=0 total=25
Your new account is locked with a password. Please give a password. Do not forget this password.
Passphrase:
Repeat passphrase:
Address: {461d9bc69d4a32cb599310843bf5bf88342cc03c}
$ geth --datadir NodeD/data account new
WARN [09-14|10:19:09.591] Sanitizing cache to Go's GC limits provided=1024 updated=655
INFO [09-14|10:19:09.592] Maximum peer count ETH=25 LES=0 total=25
Your new account is locked with a password. Please give a password. Do not forget this password.
Passphrase:
Repeat passphrase:
Address: {51ef0c6536e69e2ea46f5ec5e150da423305c63d}
|
为了添加账户到初始区块,使用上述产生的账户地址更新genesis.json文件的alloc字段内容。
 1
 2
 3
 4
 5
 6
 7
 8
 9
10
11
12
13
14
15
16
17
18
19
20
21
22
23
24
25
26
27
28
29
30
31
32
33
34
35
36
37
38
39
40
41
42
43
| $ cat NodeA/genesis.json
{
"config": {
"chainId": 10,
"homesteadBlock": 0,
"eip150Block": 0,
"eip150Hash": "0x0000000000000000000000000000000000000000000000000000000000000000",
"eip155Block": 0,
"eip158Block": 0,
"byzantiumBlock": 0,
"constantinopleBlock": 0,
"istanbul": {
"epoch": 30000,
"policy": 0
},
"txnSizeLimit": 64,
"isQuorum": true
},
"nonce": "0x0",
"timestamp": "0x5d7c4ae8",
"extraData": "0x0000000000000000000000000000000000000000000000000000000000000000f89af8549493c20b1ffa9bf8738bf194d5203e3d2e2a48428d94ff75bd429c43de6719c2983c1e991b027990955994f22670e572a42729a2c10fb26f57bba46cbc3a4294350686ae7615e87a046fc4261fe58fda3872aa65b8410000000000000000000000000000000000000000000000000000000000000000000000000000000000000000000000000000000000000000000000000000000000c0",
"gasLimit": "0xe0000000",
"difficulty": "0x1",
"mixHash": "0x63746963616c2062797a616e74696e65206661756c7420746f6c6572616e6365",
"coinbase": "0x0000000000000000000000000000000000000000",
"alloc": {
"b619ead9d3d72b675a471b3d8ff67673de8ae7f4": {
"balance": "0x446c3b15f9926687d2c40534fdb564000000000000"
},
"4cd5ae20dba37c96717f328dc6c02e1c1927be1c": {
"balance": "0x446c3b15f9926687d2c40534fdb564000000000000"
},
"461d9bc69d4a32cb599310843bf5bf88342cc03c": {
"balance": "0x446c3b15f9926687d2c40534fdb564000000000000"
},
"51ef0c6536e69e2ea46f5ec5e150da423305c63d": {
"balance": "0x446c3b15f9926687d2c40534fdb564000000000000"
}
},
"number": "0x0",
"gasUsed": "0x0",
"parentHash": "0x0000000000000000000000000000000000000000000000000000000000000000"
}
|
将之前步骤中产生的初始化文件移动到相应节点的工作目录。这些文件现在位于领导节点的工作目录。genesis.json放到每个节点的工作目录, static-nodes.json放到每个节点的data目录。X/nodekey放到对应节点的data/geth
 1
 2
 3
 4
 5
 6
 7
 8
 9
10
11
| cp NodeA/genesis.json NodeB
cp NodeA/genesis.json NodeC
cp NodeA/genesis.json NodeD
cp NodeA/static-nodes.json NodeA/data/
cp NodeA/static-nodes.json NodeB/data/
cp NodeA/static-nodes.json NodeC/data/
cp NodeA/static-nodes.json NodeD/data/
cp NodeA/0/nodekey NodeA/data/geth
cp NodeA/1/nodekey NodeB/data/geth
cp NodeA/2/nodekey NodeC/data/geth
cp NodeA/3/nodekey NodeD/data/geth
|
将NodeB,NodeC,NodeD文件夹使用ftp文件传输协议分别移动到对应的三个设备的用户主目录下,使用的软件是FileZilla。
分别在各自设备的迁移过去的Node文件夹根目录执行节点初始化工作
 1
 2
 3
 4
 5
 6
 7
 8
 9
10
11
12
13
14
15
16
17
18
19
20
21
22
23
24
25
26
27
28
29
30
31
32
33
34
35
36
37
38
39
40
41
42
43
44
45
46
| # 在NodeA设备
$ cd NodeA
$ geth --datadir data init genesis.json
WARN [09-14|10:42:06.033] Sanitizing cache to Go's GC limits provided=1024 updated=655
INFO [09-14|10:42:06.049] Maximum peer count ETH=25 LES=0 total=25
INFO [09-14|10:42:06.056] Allocated cache and file handles database=/home/shuzang/istanbul/NodeA/data/geth/chaindata cache=16 handles=16
INFO [09-14|10:42:06.079] Writing custom genesis block
INFO [09-14|10:42:06.088] Persisted trie from memory database nodes=5 size=819.00B time=224.043µs gcnodes=0 gcsize=0.00B gctime=0s livenodes=1 livesize=0.00B
INFO [09-14|10:42:06.088] Successfully wrote genesis state database=chaindata hash=7d00b6…27b2d4
INFO [09-14|10:42:06.088] Allocated cache and file handles database=/home/shuzang/istanbul/NodeA/data/geth/lightchaindata cache=16 handles=16
INFO [09-14|10:42:06.091] Writing custom genesis block
INFO [09-14|10:42:06.091] Persisted trie from memory database nodes=5 size=819.00B time=48.242µs gcnodes=0 gcsize=0.00B gctime=0s livenodes=1 livesize=0.00B
INFO [09-14|10:42:06.091] Successfully wrote genesis state database=lightchaindata hash=7d00b6…27b2d4
# 在NodeB设备
$ cd ~/NodeB
$ geth --datadir data init genesis.json
# 在NodeC设备
$ cd ~/NodeC
$ geth --datadir data init genesis.json
WARN [09-14|10:44:13.570] Sanitizing cache to Go's GC limits provided=1024 updated=308
INFO [09-14|10:44:13.594] Maximum peer count ETH=25 LES=0 total=25
INFO [09-14|10:44:13.607] Allocated cache and file handles database=/home/pi/NodeC/data/geth/chaindata cache=16 handles=16
INFO [09-14|10:44:13.659] Writing custom genesis block
INFO [09-14|10:44:13.663] Persisted trie from memory database nodes=5 size=819.00B time=679.667µs gcnodes=0 gcsize=0.00B gctime=0s livenodes=1 livesize=0.00B
INFO [09-14|10:44:13.666] Successfully wrote genesis state database=chaindata hash=7d00b6…27b2d4
INFO [09-14|10:44:13.666] Allocated cache and file handles database=/home/pi/NodeC/data/geth/lightchaindata cache=16 handles=16
INFO [09-14|10:44:13.694] Writing custom genesis block
INFO [09-14|10:44:13.697] Persisted trie from memory database nodes=5 size=819.00B time=573.516µs gcnodes=0 gcsize=0.00B gctime=0s livenodes=1 livesize=0.00B
INFO [09-14|10:44:13.699] Successfully wrote genesis state database=lightchaindata hash=7d00b6…27b2d4
# 在NodeD设备
$ cd ~/NodeD
$ geth --datadir data init genesis.json
WARN [09-14|10:45:59.139] Sanitizing cache to Go's GC limits provided=1024 updated=308
INFO [09-14|10:45:59.155] Maximum peer count ETH=25 LES=0 total=25
INFO [09-14|10:45:59.166] Allocated cache and file handles database=/home/pi/NodeD/data/geth/chaindata cache=16 handles=16
INFO [09-14|10:45:59.215] Writing custom genesis block
INFO [09-14|10:45:59.234] Persisted trie from memory database nodes=5 size=819.00B time=16.193125ms gcnodes=0 gcsize=0.00B gctime=0s livenodes=1 livesize=0.00B
INFO [09-14|10:45:59.239] Successfully wrote genesis state database=chaindata hash=7d00b6…27b2d4
INFO [09-14|10:45:59.240] Allocated cache and file handles database=/home/pi/NodeD/data/geth/lightchaindata cache=16 handles=16
INFO [09-14|10:45:59.265] Writing custom genesis block
INFO [09-14|10:45:59.269] Persisted trie from memory database nodes=5 size=819.00B time=596.146µs gcnodes=0 gcsize=0.00B gctime=0s livenodes=1 livesize=0.00B
INFO [09-14|10:45:59.271] Successfully wrote genesis state database=lightchaindata hash=7d00b6…27b2d4
|
以下步骤在四个设备上都要执行
在各自设备Node目录下创建start.sh脚本用于启动节点,脚本基本内容如下
1
2
| #!/bin/bash
PRIVATE_CONFIG=ignore nohup geth --datadir data --nodiscover --istanbul.blockperiod 5 --syncmode full --mine --minerthreads 1 --verbosity 5 --networkid 10 --rpc --rpcaddr 0.0.0.0 --rpcapi admin,db,eth,debug,miner,net,shh,txpool,personal,web3,quorum,istanbul --ws --wsorigins="*" --wsaddr 0.0.0.0 --emitcheckpoints --port 30303 2>>node.log &
|
查找是否有残留启动的geth进程,若有,杀掉该进程
1
2
3
4
| See if the any geth nodes are running.
$ ps | grep geth
Kill geth processes
$ killall -INT geth
|
授予start.sh脚本执行权限,执行该脚本
1
2
3
| .... 跳转到脚本所在目录
$ chmod +x start.sh
$ ./start.sh
|
执行完后查找geth进程是否启动,并执行geth attach命令接入geth控制台
1
2
| $ ps | grep geth
16877 pts/0 00:00:01 geth
|
接下来可在任一设备的节点目录下使用geth attach命令接入geth控制台执行操作
 1
 2
 3
 4
 5
 6
 7
 8
 9
10
11
| $ geth attach data/geth.ipc
WARN [09-14|11:00:13.142] Sanitizing cache to Go's GC limits provided=1024 updated=655
Welcome to the Geth JavaScript console!
instance: Geth/v1.8.18-stable-c894c2d7(quorum-v2.2.5)/linux-amd64/go1.11.12
coinbase: 0x93c20b1ffa9bf8738bf194d5203e3d2e2a48428d
at block: 0 (Sat, 14 Sep 2019 10:05:28 CST)
datadir: /home/shuzang/istanbul/NodeA/data
modules: admin:1.0 debug:1.0 eth:1.0 istanbul:1.0 miner:1.0 net:1.0 personal:1.0 rpc:1.0 txpool:1.0 web3:1.0
>
|
在NodeA的geth控制台使用admin.peers命令查看已连接节点,可以看到NodeC和NodeD都已接入。NodeB设备此时未启动,所以没有接入。
 1
 2
 3
 4
 5
 6
 7
 8
 9
10
11
12
13
14
15
16
17
18
19
20
21
22
23
24
25
26
27
28
29
30
31
32
33
34
35
36
37
38
39
40
| > admin.peers
[{
caps: ["istanbul/64"],
enode: "enode://214dce3278a2b45fb0bf2a1d53c24eb213c5cbb08307e842feab0202cad4f685c5c62a4197d29318f07eb813bf4189db05096b551849039bf81fb74f0211320f@192.168.191.5:45822",
id: "5e62fd3b39e5ae259d604f90350686ae7615e87a046fc4261fe58fda3872aa65",
name: "Geth/v1.8.18-stable(quorum-v2.2.5)/linux-arm/go1.11.6",
network: {
inbound: true,
localAddress: "192.168.191.2:30303",
remoteAddress: "192.168.191.5:45822",
static: false,
trusted: false
},
protocols: {
istanbul: {
difficulty: 1,
head: "0x7d00b604f84c3962821cecbf007d8cf0c3e185d6c3b12a901ec4d996d927b2d4",
version: 64
}
}
}, {
caps: ["istanbul/64"],
enode: "enode://cb50baa67204df2246b143e2982e40a89b2924e5c19e2834876c34042f0a81a2e2604ab210d19a048762f5355258d9840932ba868227857d928495d398c04af0@192.168.191.4:47390",
id: "c31b4abe77e8a91a1a03d06ff22670e572a42729a2c10fb26f57bba46cbc3a42",
name: "Geth/v1.8.18-stable(quorum-v2.2.5)/linux-arm/go1.11.6",
network: {
inbound: true,
localAddress: "192.168.191.2:30303",
remoteAddress: "192.168.191.4:47390",
static: false,
trusted: false
},
protocols: {
istanbul: {
difficulty: 1,
head: "0x7d00b604f84c3962821cecbf007d8cf0c3e185d6c3b12a901ec4d996d927b2d4",
version: 64
}
}
}]
|
至此私链网络搭建完毕,之后交易和合约部署都可通过geth控制台进行
五. 总结
由于网络质量问题,区块链共识无法正常运行,合约部署无法完成。
1
2
3
4
5
6
| INFO [09-14|10:56:00.419] Commit new mining work number=1 sealhash=1305ae…019d90 uncles=0 txs=0 gas=0 fees=0 elapsed=556.954µs
TRACE[09-14|10:56:00.420] Dial error task="staticdial 5e62fd3b39e5ae25 192.168.191.5:30303" err="dial tcp 192.168.191.5:30303: connect: connection refused"
DEBUG[09-14|10:56:00.421] Can't resolve node id=0x8e6a40 err="discovery is disabled"
TRACE[09-14|10:56:00.421] Dial task done task="staticdial 5e62fd3b39e5ae25 192.168.191.5:30303"
TRACE[09-14|10:56:00.420] handleRequest address=0x93C20b1ffA9BF8738BF194d5203e3D2E2A48428d state="Accept request" seq=1 number=1 hash=23cc4d…b11876
TRACE[09-14|10:56:00.422] Dial error task="staticdial c31b4abe77e8a91a 192.168.191.4:30303" err="dial tcp 192.168.191.4:30303: connect: connection refused"
|
主要原因估计是PC上的节点装在了虚拟机里,虚拟机又使用桥接模式,导致最后丢包率和延迟都比较高。
解决Hyper-V内虚拟机网络延迟高的问题(ping延时大)
附录 树莓派安装 quourm 节点
在熟悉了树莓派并和虚拟机顺利组网以后,首要面临的事情就是在树莓派中安装quorum节点,由于暂时不使用隐私保护功能,不安装隐私管理器Tessera或Constellation。需要安装的只包括:
- quorum的客户端geth
- Istanbul BFT共识配置工具istanbul-tool
交叉编译(2019.09.09)
quorum项目没有提供可用于arm架构的二进制包,只能自己编译。然而,在树莓派中直接进行编译存在两个问题
- 会占用很多不必要的空间,quorum项目文件编译后大小在360M以上
- 编译istanbul-tool依赖于golang的某些包,需要访问google,很多ip无法访问。
因此,最终选择了在PC中进行交叉编译,幸运的是,由于quorum的源项目ethereum可以交叉编译,quorum继承了交叉编译的功能。文档仍然需要看Cross compiling Ethereum。交叉编译依赖于名为xgo的包,而这个包依赖于Docker和Go,因此,交叉编译之前需要先安装它们。
注:交叉编译在Ubuntu18.04系统下进行。
安装golang
1
2
| sudo snap install go --classic
go version
|
安装docker(使用脚本)
1
2
3
4
5
6
| $ curl -fsSL https://get.docker.com -o get-docker.sh
$ sudo sh get-docker.sh
<output truncated>
# 想在非root用户下运行,需要将用户添加到docker group。执行如下命令
$ sudo usermod -aG docker your-user
|
下载quorum
1
| git clone https://github.com/jpmorganchase/quorum.git
|
执行交叉编译
1
2
3
4
| $ cd quorum
$ make geth-linux-arm-7
$ cd build/bin
# 在该目录下可以找到编译后的geth文件
|
心态爆炸,交叉编译后的geth在树莓派中无法执行,Ubuntu18.04下原本编译完直接放到/usr/local/bin下面即可使用,raspbian中当我放到同样的目录下不起作用,也不知道是交叉编译失败了还是raspbian系统不支持。考虑到raspbian基于Debian,现在不知道Debian应该把可执行文件放在哪里,网上找了很久没找到相关资料。(交叉编译其实可以,直接跳到文章最后可看到方法)
Ubuntu mate(09.10 am)
quorum的issue中有个项目组的回答,其中说quorum运行在树莓派中是肯定可以的,这一点终于可以放心,还推荐用Ubuntu,那就试试。
“Yes. Whilst I haven’t tried it, I’m aware that folks have done this and you can find articles on the internet describing how to do it for Ethereum (Quorum will be the same). My suggestion would be to install Ubuntu on the Rasberry and follow the normal steps for building Quorum.”
树莓派官网提供的Ubuntu可用镜像有三种:Ubuntu Mate,Ubuntu Core,Ubuntu Server。看到Ubuntu Mate的种种特性,我动心了,看起来好像是专门定制的。
Ubuntu Mate说明及下载,选择的镜像是
1
2
3
4
5
| Raspberry Pi(recommended)
For aarch32(ARMv7)computers,like:
- Raspberry Pi Model B 2
- Raspberry Pi Model B 3
- Raspberry Pi Model B 3+
|
下载,镜像写入,根目录预先建立ssh和wpa_supplicant.conf文件,插入树莓派,启动运行,扫描不到ip,看起来WiFi没法自动联网。通过网线接到PC上共享网络,ssh访问被拒,接到路由器上一样不行。找资料,关于Ubuntu mate的资料比较少,最终在官方下载页-Additional feature找到一个对特性的说明,称Ubuntu mate没有像raspbian的pi账户一样预定义的用户账户,所有的配置需要在第一次启动时手动完成,ssh预先也没有安装,需要启动后自己安装openssh-server并启用。完了,彻底崩溃,本来没有用户账户就无法登录,连ssh都没有,第一次必须得用屏幕了。屏幕,我没有。。。
考虑到笔记本电脑上有个HDMI接口,买线总比买屏幕便宜,跑到商店买了根双头HDMI线。回来一试,没用,网上说是因为笔记本的HDMI只能输出信号,没法输入,因此不能作为HDMI屏幕使用。转眼又看到了VGA接口,这个怎么样,结果一查,HDMI转VGA也没用,笔记本的VGA同样只有输出功能,平板,手机全都不行,不能作为显示设备,最多只能用ssh连接。
台式机的显示器总行了吧,资料上说要自带电源,怕烧坏树莓派。没事,台式的显示器本来就接电源线。又去店里换一个HDMI转VGA的线,是店里唯一的线,结果是坏的,把线接到树莓派上没有反应,提示请检查线缆而不是无信号输入,拿笔记本试了一下,果然不行,完全检测不到第二屏幕。换!店里没线了怎么办,本来想换HDMI转DVI的,因为显示器后面还有个DVI接口,但店员小哥不推荐,说是用DVI的少,最后拿了HDMI转VGA母口的线,又多买了一根双头VGA线,亏到爆。
不过,总算好使了。
当在显示器上看到Ubuntu mate的界面时我是激动的,太不容易了。初始配置之后还需要进行系统安装,怪不得没法直接进入。但是路由器的WiFi接入不了,或者连接后没法上网,完全没有头绪,只好先用手机开了热点,这倒是没问题。
把之前交叉编译的geth文件拷贝到了Ubuntu mate,放到/usr/local/bin目录下,运行geth version测试,倒是可以了,可惜屏幕打印的文本乱码。重新启动了一下树莓派,结果无限循环启动。初始界面提示如下
1
| Driver 'sdhost-bcm2835' already registered, aborting...
|
论坛上也有人遇到了这个问题,但从去年11月到今年5月,回帖的所有人都遇到同样的问题而没有办法解决,我已经放弃了。
Raspbian下自编译quorum(09.10 pm)
树莓派上编译使用quorum的人不多,但编译ethereum的人绝对不少,现在想起来,终于意识到一件事,大部分人还是在raspbian系统下编译使用的,既然ethereum的geth客户端可以,quorum没道理不行。有可能不是系统的问题,因为raspbian和ubuntu其实都属于基于Debian的发行版,那就是交叉编译问题了。找不到哪里出的错,干脆直接在Raspbian下编译一次quorum吧,空间占用多一点就多一点,还是足够的,唯一的问题只有翻墙,但这是没办法的事情,而且geth的编译暂时还不需要,istanbul-tool才需要。
注:其实raspbian下翻墙试过了,我有surfshark的账号,官方也给了步骤,How to set up Surfshark VPN on Raspberry Pi,但最后一步连接总是出错,错误提示为
TLS Error: TLS handshake failed
网上关于这个Error的问题不少,但都没起作用,就放弃了。
重新写入了之前备份的raspbian镜像(备份真的很有用,能省好多事儿)。启动树莓派,使用预定义的静态ip登录,安装go,下载github上的quorum项目(主要是这里直接下载比git clone快多了)。执行编译,注意使用sudo make all,因为编译需要分配存储空间,不给权限过不了。
树莓派卡死了。。。
重启了一次,第二次又卡死了,看来不是意外,应该是编译出了问题,果然,等了很久后,编译退出,系统正常了,但出现了错误提示,是一个存储问题。
1
| running gcc failed: fork/exec /usr/bin/gcc: cannot allocate memory
|
Ethereum的论坛有人在编译时遇到了同样的问题,Installing geth on Raspberry Pi 3 - cannot allocate memory error,回帖提到是因为编译所需的内存不够的缘故,建议杀掉内存占用大而且不用的进程。使用free -h查看
1
2
3
| total used free shared buff/cache available
Mem: 926Mi 119Mi 575Mi 7.0Mi 231Mi 744Mi
Swap: 99Mi 0B 99Mi
|
不算少啊,700多M呢,再用top命令看进程,并按M键按内存占用排序,发现杀哪个进程都不合适。回帖中还有人提到可以调整交换空间大小,就是第二行的Swap,树莓派默认100M,可以调大点,问题的说明及解决方案见How to set up swap space。
树莓派使用dphys-swapfile文件定义交换空间大小,打开配置文件
1
| sudo nano /etc/dphys-swapfile
|
启用内容只有一行
代表默认100M交换空间大小,把数值改成合适的内容,我直接改了1024。然后重新启用新的配置文件。
1
| sudo /etc/init.d/dphys-swapfile restart
|
完成后再用free -h命令查看交换空间大小就变了,此时重新编译,编译速度会大大加快,等待一段时间后,编译顺利执行完毕。将编译得到的文件复制到/usr/local/bin目录下。
1
2
3
4
| $ sudo cp build/bin/geth /usr/local/bin
$ sudo cp build/bin/bootnode /usr/local/bin
# 验证
$ geth version
|
成功。
istantul-tool的编译毫无办法,编译过程要访问google,有些ip无法访问,但既然这里编译没有指明针对arm架构,明天把虚拟机编译好的文件拿过来试试。
Linux编译得到的istanbul文件在树莓派中无法执行,错误提示为
1
| -bash: ./istanbul: cannot execute binary file: Exec format error
|
使用file istanbul命令查看文件信息
1
| istanbul: ELF 64-bit LSB executable, x86-64, version 1 (SYSV), dynamically linked, interpreter /lib64/ld-linux-x86-64 .so.2, for GNU/Linux 3.2.0, Go BuildID=Whu77pcg5_4qdJyzC6lH/RiHbDbxGfs3BFqYFYhdk/Uvgfkwy9en1ShuGpCcPB/qCr7Qg3bewybrm4 vmE3B, BuildID[sha1]=588353ce35513ef4a2d9695f458a338e226093b1, not stripped
|
x86-64的,看来还是架构相关,项目本身没有提供对arm的编译功能,没有办法了。不过有可能不需要在树莓派中运行,我们只需要在作为主节点的虚拟机利用它生成各节点数据,然后拷贝到树莓派中就行。
运行geth文件(09.11 am)
直接拷贝编译的geth文件到另一个树莓派,并使用cp命令复制到/usr/local/bin目录无法执行,提示
1
| -bash: /usr/local/bin/geth: Permission denied
|
是因为没有执行权限,使用chmod命令授予权限即可顺利执行
 1
 2
 3
 4
 5
 6
 7
 8
 9
10
11
12
13
14
15
| $ cd quorum
$ sudo cp build/bin/geth /usr/local/bin
$ sudo chmod +x /usr/local/bin/geth
$ geth version
WARN [09-11|03:13:38.840] Sanitizing cache to Go's GC limits provided=1024 updated=308
Geth
Version: 1.8.18-stable
Quorum Version: 2.2.5
Architecture: arm
Protocol Versions: [63 62]
Network Id: 1337
Go Version: go1.11.6
Operating System: linux
GOPATH=
GOROOT=/usr/lib/go-1.11
|
这样看来,交叉编译的结果也不是因为系统不支持,应该也是没有执行权限,下面是使用geth version命令测试交叉编译的geth的结果。
 1
 2
 3
 4
 5
 6
 7
 8
 9
10
11
12
| WARN [09-11|03:27:52.671] Sanitizing cache to Go's GC limits provided=1024 updated=308
Geth
Version: 1.8.18-stable
Git Commit: 7e87e403407fcb3b3c417739eef2fe1dae923add
Quorum Version: 2.2.5
Architecture: arm
Protocol Versions: [63 62]
Network Id: 1337
Go Version: go1.12
Operating System: linux
GOPATH=
GOROOT=/usr/local/go
|
走了好多弯路。。。原来一开始的结果就可以。
 支付宝
支付宝 微信
微信