警告
本文最后更新于 2020-11-24,文中内容可能已过时。
根据之前几篇文章的分析,我们对优化后的新方案进行了实现,本篇介绍新方案的一些测试与验证过程。代码可以参考 BBRAC 仓库的 truffle 分支,但是该分支包括后面添加的恶意行为检测的内容,是进行了二次完善后的代码。
1. 智能合约
新的合约系统中依然包含Register Contract(注册合约,RC),Access Control Contract(访问控制合约,ACC)和 Judge Contract(判决合约,JC)三种合约。
1.1 Gas消耗统计
三个合约部署的Gas消耗统计如下
| 合约名 | transaction cost | execution cost |
|---|
| RC | 3285811 gas | 2457443 gas |
| ACC | 5380922 gas | 4047334 gas |
| JC | 1375161 gas | 1002445 gas |
消耗的代币数量 = gas × gasprice,gasprice的货币单位决定代币的货币单位。
在Quorum网络中,这些Gas消耗没有实际意义,因为gasprice = 0,合约部署前会判断用户是否拥有足够的gas,但不会真的扣除。
1.2 合约功能说明
RC实现的功能大致分为两类,第一部分对合约进行管理,第二部分对属性进行管理
ACC实现的功能分为三类,第一部分对设备自身拥有的资源属性进行管理,第二部分对访问控制策略进行管理,第三部分是访问控制函数
JC实现两个函数,第一个是恶意行为判决,第二个用来查询恶意行为
2. 审计
智能合约的安全性非常重要,行业内对智能合约进行安全性分析称之为「审计」
2.1 工具选取
基本的思路是选取合适的自动审计工具来对编写完成的合约进行分析,参考了 关于形式化验证两大工具 (Vass & Mythril) 测试对比 这篇文章。
在经过大量查找后发现,商业化应用的审计工具以上文中提到的这两款(Vass 和 Mythril) 最为普及。我们首先使用成都链安的 Vass 工具进行分析,然而发现,在合约中存在内联汇编时,Vass 无法编译合约,更谈不上审计,然而内联汇编在我们的合约中是必要的,因此换用 Mythril。
工具是由以太坊开源社区所提供的安全分析工具,而建立在Mythril上的合约分析平台 MythX具有更高的可用性并覆盖了更广泛的安全问题,因此最终使用MythX 完成统计分析。MythX 拥有 Remix、VScode 和 Truffle 的插件,因此无论以哪种方式编辑合约,都可以轻松的进行安全分析,但首先需要拥有 MythX 的账户。
首先在 https://dashboard.mythx.io/#/registration 页面使用邮箱进行注册,之后关联 MetaMask 以太坊账户,MythX 将提供一个密码供 Remix 等工具中的插件使用,也可以自己设定,但设定的密码要求长度为 6-64 位,至少一个小写字符,一个大写字符,一个数字和一个符号,该要求的原文如下:
1
| Password needs to contain: Length: 8 and 64 characters; One lowercase (a-z) and uppercase (A-Z) letter; One digit (0-9); One symbol (e.g. !"#$%&/()., )
|
2.2 审计
打开 Remix 界面,在插件列表搜索 MythX,点击Activate将插件激活。
以 Remix 自带的示例合约 ballot.sol 为例,首先编译该合约,然后切换到 MythX 选项卡,输入之前关联到 MythX 的以太坊账户地址,MythX 提供的或自己更改后的密码,点击Save,然后点击Analyze
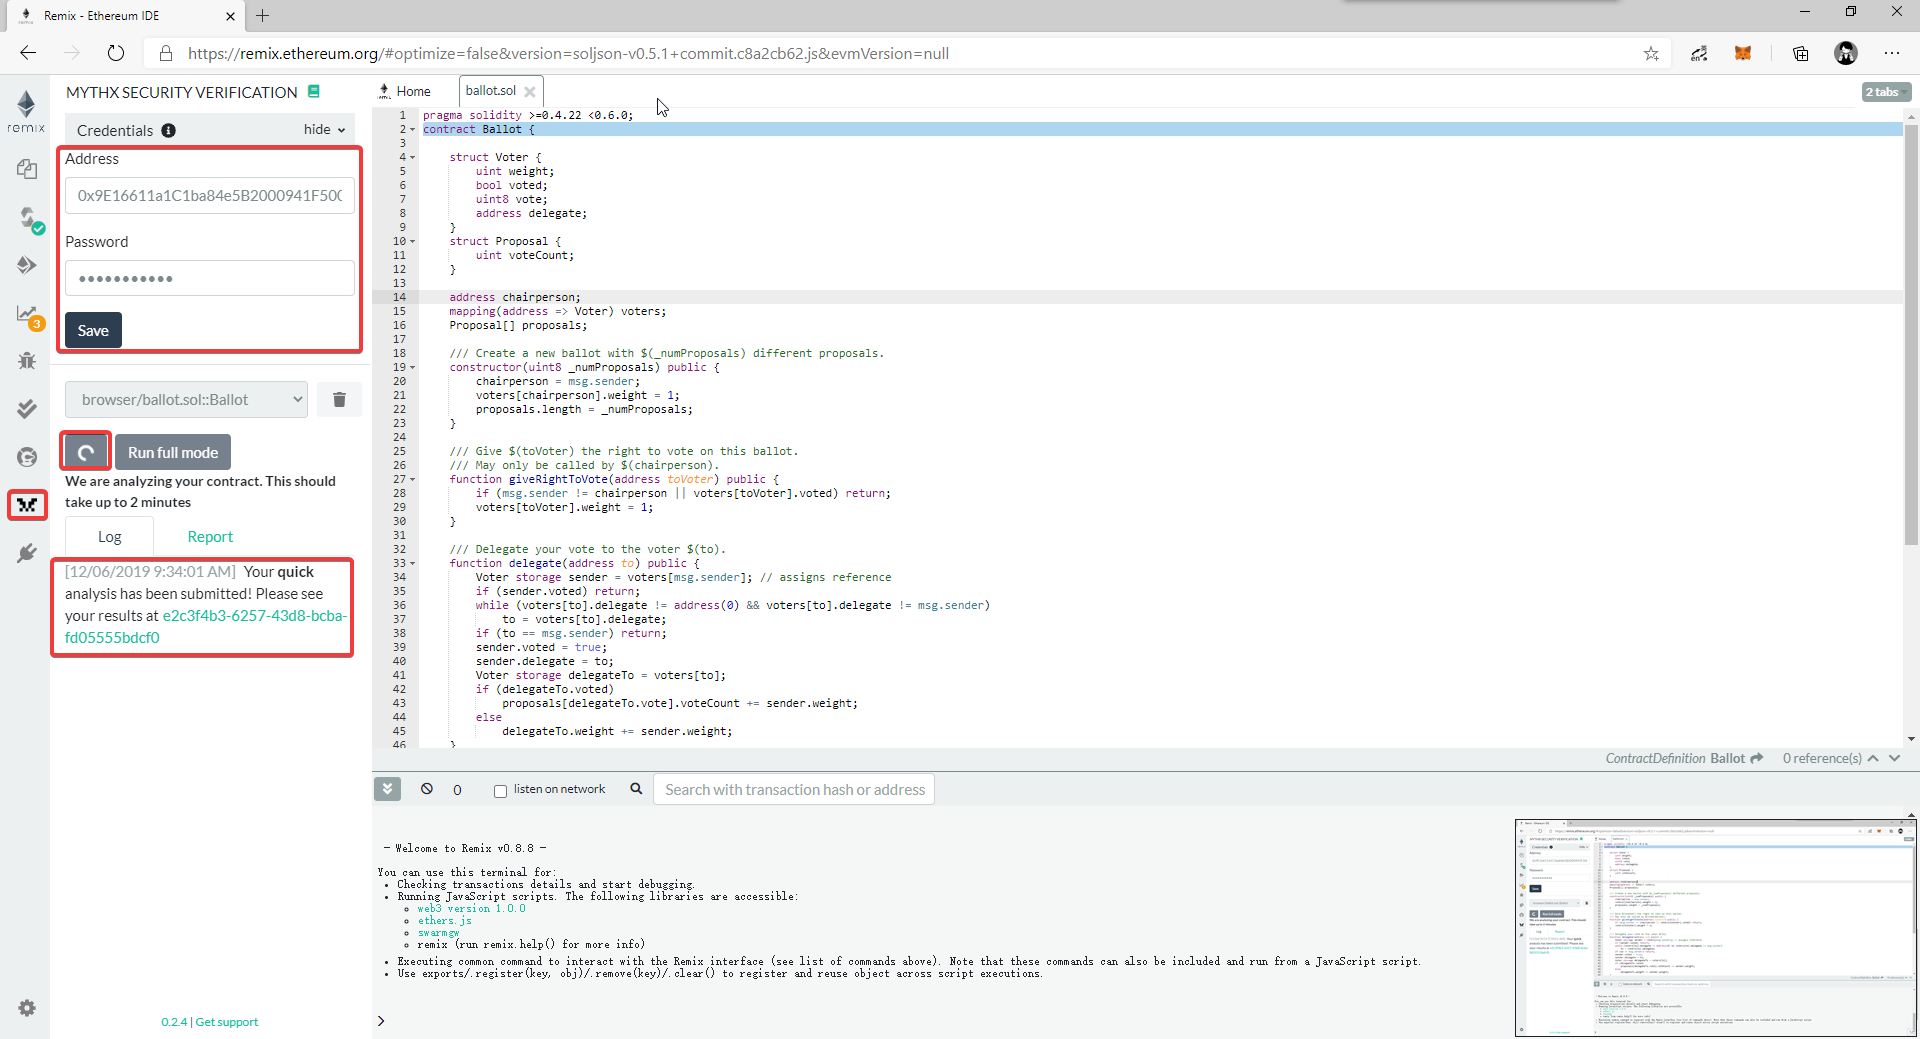
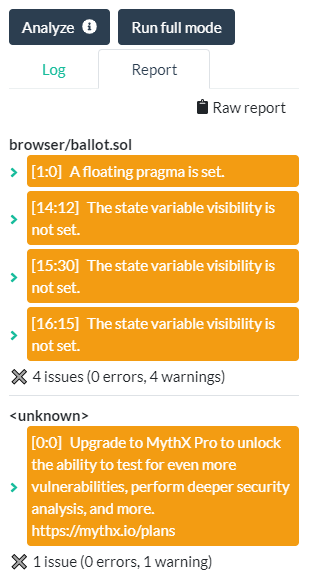
经过一段时间的等待后,将可以在Report界面查看到安全分析结果
也可以点击上图 Log 记录中的链接进入 MythX Dashboard 查看详细结果

点击Analysed Files查看错误的详细位置与说明,然后更改源代码,重新测试,直到合约安全性达到自己想要的结果。

检测到的合约弱点(漏洞)以SWC-XXX编号的形式出现,由 https://swcregistry.io/ 可查看完整的安全问题列表和解释。但是,免费的 MythX 只能检测10种安全问题,Pro版和企业版可以检测26种安全问题,具体对每种安全问题的支持程度见该页面: https://mythx.io/swc-coverage/
当前调试过程种,遇到的典型安全问题是 SWC-101:Integer Overflow and Underflow 问题,问题的具体分析可参考 solidity-issue #796
2.3 审计结果
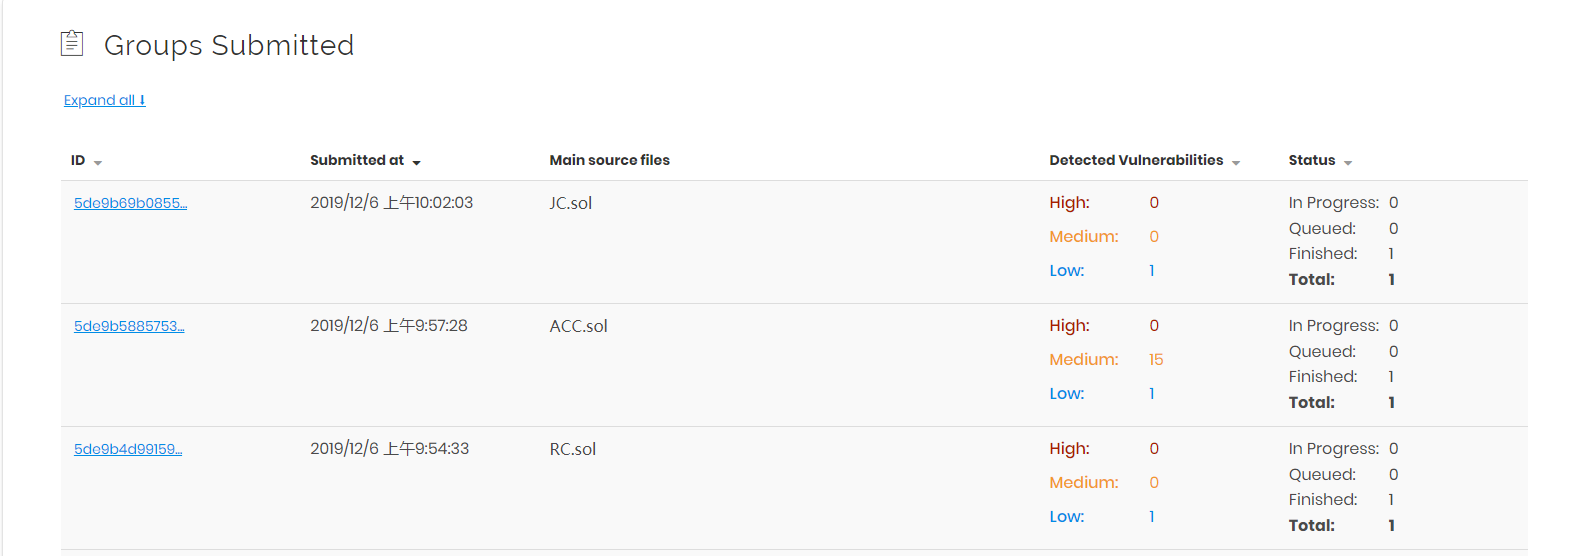
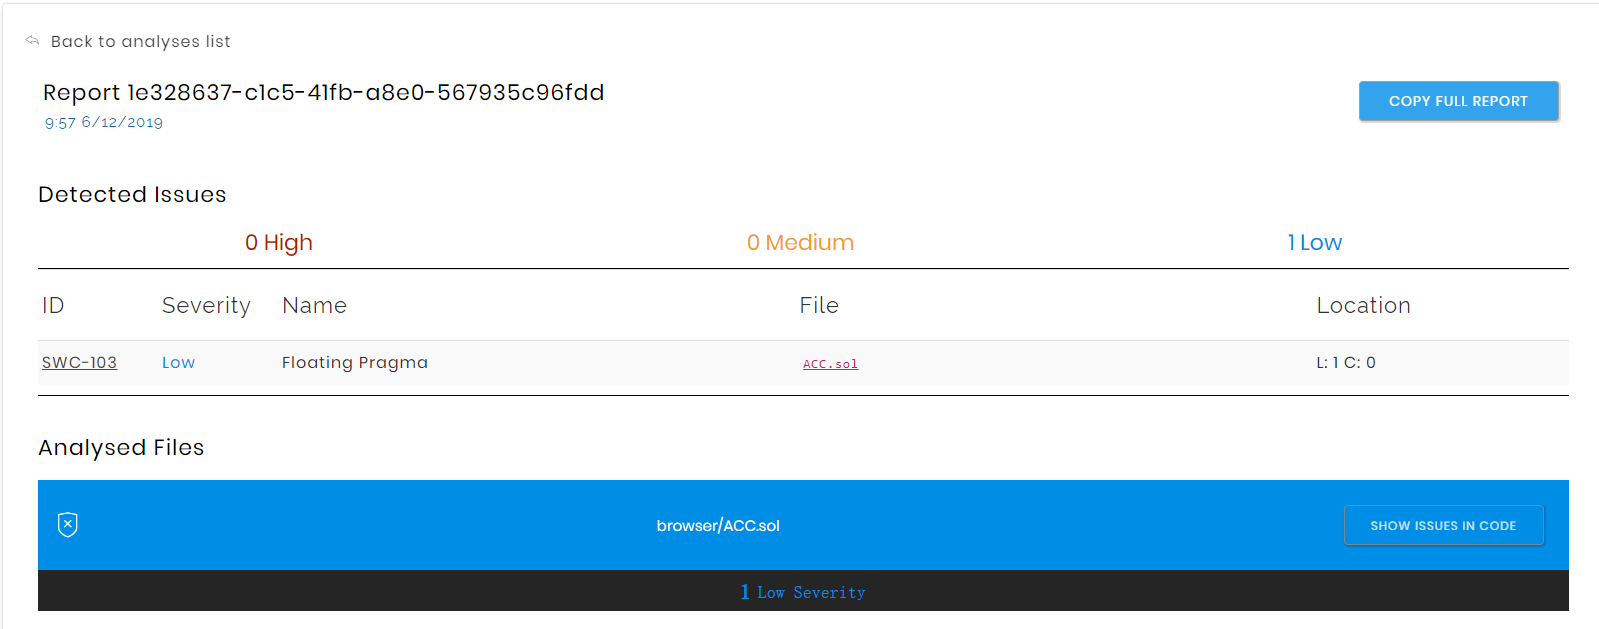
我们所编写的 RC,ACC 和 JC 三个合约在经过多次修改后,将出现的安全问题降低到了可接受的程度,如下图所示
三个合约出现的低级安全问题均为SWC-103: Floating Pragma ,即编译器的版本指定为一个范围,但这样具有更好的适用性,因此不进行修改
1
| pragma solidity >=0.4.22 <0.6.0;
|
ACC出现的15个中级安全问题在详情列表中无法查看
邮件询问后官方的回复如下,字节码级别的错误如果不依靠安全工具很难检出并修正,因此我们只能忽略掉这些安全问题。
Josh Reid (MythX)
Dec 5, 11:11 AST
Hello,
Thanks for reaching out to MythX support! We are currently investigating any potential issues that may be causing these vulnerabilities to not be displayed fully, however this may also be due to the vulnerabilities being detected only on the bytecode.
Unfortunately, at this time we do no have the ability to display bytecode vulnerabilities as we cannot specify where they are. However, this is something we are looking to evaluate and differentiate on more as we go forward. I apologize for any confusion this may have caused and will be sure to update you if we find any issues as we continue to look into this. In the meantime, thanks so much for your patience and cooperation! Is there anything else I can help you with at this time?
Best,
Josh
3. 系统测试
本节介绍合约在 Quorum 区块链网络中的部署过程和访问控制的测试实现。由于论文复现的时候发现手动配置的复杂性太高,极易出错,而一旦出错就必须重来,因此这次的优化实验决定使用 truffle 进行部署测试。
3.1 账户设置
按设计,Raspberry Pi 3B+ 是 lightnode1,Raspberry Pi 3B 是 linghtnode2。区块链网络启动后,四个 validator 各有 1050 wei(1018是 1 ether),但是后面加入区块链网络的两台树莓派是普通节点,余额为 0,所以首先由 node0 向两个账户分别转账 1 ether。
1
2
| # lightnode1账户地址为:"0x77c22157a3b8840d34b8ed5975b5f2597bd6a7a2"
# lightnode2账户地址为:"0xa31d40508da63fb00d7e2f4db57c3774384aa299"
|
在 node0 的 geth console 中解锁账户,并分别向 lightnode1 和 lightnode2 转账 1 ether
 1
 2
 3
 4
 5
 6
 7
 8
 9
10
11
12
13
14
15
| > eth.accounts
["0xbffe4ff0cbd0a7590fb71966d1e6bb1a4c2359e0"]
> eth.getBalance(eth.accounts[0])
1e+50
> personal.unlockAccount(eth.accounts[0])
Unlock account 0xbffe4ff0cbd0a7590fb71966d1e6bb1a4c2359e0
Passphrase:
true
>
> eth.sendTransaction({from:eth.accounts[0], to:"0x77c22157a3b8840d34b8ed5975b5f2597bd6a7a2", value:1*1e18})
"0x3ed3cbc568a64dff3c3fe4a00b87d259d2299953c47e284b19253299eb8c4725"
> eth.sendTransaction({from:eth.accounts[0], to:"0xa31d40508da63fb00d7e2f4db57c3774384aa299", value:1*1e18})
"0xc9e4193164d38d94502960fcc0d1d7c2e22a9f04307145945c4ae525c6d99aee"
> eth.getBalance(eth.accounts[0])
9.9999999999999999999999999999998e+49
|
在 lightnode1 和 lightnode2 的 geth console 执行下列命令查询余额,由结果可知转账成功。
1
2
| > web3.fromWei(eth.getBalance(eth.accounts[0]), "ether")
1
|
两台树莓派担任的角色是网关,用于管理 IoT 设备,因此分别在 lightnode1 和 lightnode2 中建立新账户,用来代表 IoT 设备,由网关向各自管理的设备转账 107 wei,以供使用。
 1
 2
 3
 4
 5
 6
 7
 8
 9
10
11
12
13
14
15
16
17
18
19
20
21
22
23
24
25
26
27
28
29
30
31
| # lightnode1
> personal.newAccount()
Passphrase:
Repeat passphrase:
"0x9a4aa696f85c6bf96733cc5385ccaf2b7ee13f17"
> personal.listAccounts
["0x77c22157a3b8840d34b8ed5975b5f2597bd6a7a2", "0x9a4aa696f85c6bf96733cc5385ccaf2b7ee13f17"]
> personal.unlockAccount(eth.accounts[0])
Unlock account 0x77c22157a3b8840d34b8ed5975b5f2597bd6a7a2
Passphrase:
true
> eth.sendTransaction({from:eth.accounts[0],to:eth.accounts[1],value:1*1e7})
"0x35bda063bc28ff3ef68b78962f427e930824390c4d1a8857c98e2dcf70485e17"
> eth.getBalance(eth.accounts[1])
10000000
# lightnode2
> personal.newAccount()
Passphrase:
Repeat passphrase:
"0x016b71d115f1da36de58d2b78369fd3228bef3dd"
> personal.listAccounts
["0xa31d40508da63fb00d7e2f4db57c3774384aa299", "0x016b71d115f1da36de58d2b78369fd3228bef3dd"]
> personal.unlockAccount(eth.accounts[0])
Unlock account 0xa31d40508da63fb00d7e2f4db57c3774384aa299
Passphrase:
true
> eth.sendTransaction({from:eth.accounts[0],to:eth.accounts[1],value:1*1e7})
"0x96bc2b359219c72ff4f2ce910c27d4c76649685a8f9cfd1b879938317c9a1fe1"
> eth.getBalance(eth.accounts[1])
10000000
|
至此账户设置完成,接下来将 truffle 连接到 quorum 网络,部署合约
3.2 安装Truffle
在 Ubuntu18.04 下安装运行,要求 Node.js 版本高于 v8.9.4,这里全都升级到了最新
1
2
3
4
| sudo apt-get install npm
sudo npm install npm@latest -g
sudo npm install n -g
sudo n lts
|
安装 Truffle
1
2
3
4
5
6
| $ sudo npm install -g truffle
$ truffle version
Truffle v5.1.5 (core: 5.1.5)
Solidity v0.5.12 (solc-js)
Node v12.14.0
Web3.js v1.2.1
|
3.3 创建项目和基本配置
建立空项目
初始化项目
1
2
3
4
5
| $ truffle init
✔ Preparing to download box
✔ Downloading
✔ cleaning up temporary files
✔ Setting up box
|
项目文件夹中出现相关文件说明成功,此时没有任何合约和测试代码
1
2
| $ ls
contracts migrations test truffle-config.js
|
修改truffle-config.js文件进行配置,使其关联到已建立的 quorum 网络
1
2
3
4
5
6
7
8
9
10
11
12
13
14
15
16
17
18
19
20
21
22
23
24
25
26
27
28
29
30
31
32
33
| // truffle-config.js
module.exports = {
networks: {
development: {
host: "192.168.191.2", // Localhost (default: none)
port: 22000,
network_id: "10",
gasPrice: 0,
gas: 100000000,
type: "quorum"
},
lightnode1: {
host: "192.168.191.3",
port: 22000, // Standard Ethereum port (default: none)
network_id: "10",
gasPrice: 0,
gas: 10000000,
type: "quorum",
from: "0x9a4aa696f85c6bf96733cc5385ccaf2b7ee13f17",
provider: new Web3.providers.WebsocketProvider("ws://192.168.191.3:8545")
},
lightnode2: {
host: "192.168.191.4",
port: 22000, // Standard Ethereum port (default: none)
network_id: "10",
gasPrice: 0,
gas: 10000000,
type: "quorum",
from: "0x016b71d115f1da36de58d2b78369fd3228bef3dd",
provider: new Web3.providers.WebsocketProvider("ws://192.168.191.4:8545")
}
}
};
|
建立了三个网络development、lightnode1和lightnode2。第一个网络development是 node0,用来部署 RC 和 JC,第二个网络是 lightnode1,用来部署ACC,第三个网络是 lightnode2,用来发起访问控制做演示。
因为在最后设置了provider,使用 websocket 进行访问,所以实际上定义的host和port两个参数是被屏蔽的,主要是因为基于 http 的远程连接好像已经被启用了,只能使用 websocket。
参数的设置主要参考了以下两篇文档
3.4 部署
将 RC,ACC 和 JC 三个合约放入contracts文件夹,然后在项目根目录执行truffle compile编译命令,编译所有合约,不过编译命令可以不执行,因为下面的truffle migrate无论是否执行过编译都会再检查一遍,如果编译过,就忽略,如果没有编译,会自动执行编译命令。
在migrations文件夹新建文件2_deploy_contracts.js,用于部署合约,编写内容如下
1
2
3
4
5
6
7
8
9
10
11
12
| var Register = artifacts.require("Register");
var Judge = artifacts.require("Judge");
var AccessControl = artifacts.require("AccessControl");
module.exports = function(deployer, network) {
if (network == "lightnode1") {
deployer.deploy(AccessControl, Register.address, Judge.address);
} else {
deployer.deploy(Register);
deployer.deploy(Judge, 2, 3);
}
};
|
首先从 node0 部署 RC 和 JC 两个合约,truffle migrate命令默认连接truffle-config.js配置中的development网络,我们之前已将该网络设置为 node0 的 ip 和端口。
注:所有truffle migrate和truffle exec命令执行前都要先对相应的账户解锁,否则无法成功
 1
 2
 3
 4
 5
 6
 7
 8
 9
10
11
12
13
14
15
16
17
18
19
20
21
22
23
24
25
26
27
28
29
30
31
32
33
34
35
36
37
38
39
40
41
42
43
44
45
46
47
48
49
50
51
52
53
54
55
56
57
58
59
60
61
62
63
64
65
66
67
68
69
70
71
72
73
74
75
76
77
78
79
80
81
82
83
84
85
| $ truffle migrate
Compiling your contracts...
===========================
> Compiling ./contracts/ACC.sol
> Compiling ./contracts/JC.sol
> Compiling ./contracts/Migrations.sol
> Compiling ./contracts/RC.sol
> Artifacts written to /home/shuzang/AC/build/contracts
> Compiled successfully using:
- solc: 0.5.12+commit.7709ece9.Emscripten.clang
Starting migrations...
======================
> Network name: 'development'
> Network id: 10
> Block gas limit: 0x6dcd11a0
1_initial_migration.js
======================
Deploying 'Migrations'
----------------------
> transaction hash: 0xefb249903f558ccd7b6326f73a886356b55377a4262b34b81f5f9f2940b4347e
> Blocks: 0 Seconds: 4
> contract address: 0x4EC4F8BA5aEcA93955f67CFA58dbe4C57b21b37c
> block number: 2922
> block timestamp: 0x5e02bcb5
> account: 0xbfFe4ff0cBd0A7590Fb71966D1E6bb1a4c2359e0
> balance: 99999999999999999999999999999998
> gas used: 263741
> gas price: 0 gwei
> value sent: 0 ETH
> total cost: 0 ETH
> Saving migration to chain.
> Saving artifacts
-------------------------------------
> Total cost: 0 ETH
2_deploy_contracts.js
=====================
Deploying 'Register'
--------------------
> transaction hash: 0xa49e8d423980248e9c03eb52ecd3b46c15209e867285d2bc718a20620f3addd2
> Blocks: 0 Seconds: 4
> contract address: 0x8980FC2bBD25958d0c72F5ba5fa3e5faF1A48c05
> block number: 2924
> block timestamp: 0x5e02bcbf
> account: 0xbfFe4ff0cBd0A7590Fb71966D1E6bb1a4c2359e0
> balance: 99999999999999999999999999999998
> gas used: 3227866
> gas price: 0 gwei
> value sent: 0 ETH
> total cost: 0 ETH
Deploying 'Judge'
-----------------
> transaction hash: 0xaf538d559ecc72949d40bbc4d1dde67dfa535c7d5a78267c4de414b51fef4bf9
> Blocks: 0 Seconds: 4
> contract address: 0x2C2Fb0DD2440e72318Fb018f923F78Ff86541D08
> block number: 2925
> block timestamp: 0x5e02bcc4
> account: 0xbfFe4ff0cBd0A7590Fb71966D1E6bb1a4c2359e0
> balance: 99999999999999999999999999999998
> gas used: 1349320
> gas price: 0 gwei
> value sent: 0 ETH
> total cost: 0 ETH
> Saving migration to chain.
> Saving artifacts
-------------------------------------
> Total cost: 0 ETH
Summary
=======
> Total deployments: 3
> Final cost: 0 ETH
|
然后部署 ACC,truffle migrate命令指定连接网络lightnode1,--f指定部署脚本,否则因为之前该脚本已成功执行会略过,而又因为没有新的脚本而没有任何操作。truffle-config.js配置中的lightnode1网络已设置为 raspberry pi 3B+ 的 ip 和端口,默认账户设置为第二个账户,也就是新建的用于表示 IoT 设备的账户。
 1
 2
 3
 4
 5
 6
 7
 8
 9
10
11
12
13
14
15
16
17
18
19
20
21
22
23
24
25
26
27
28
29
30
31
32
33
34
35
36
37
38
39
40
41
42
| $ truffle migrate --network linghtnode1 --f 2
Compiling your contracts...
===========================
> Everything is up to date, there is nothing to compile.
Starting migrations...
======================
> Network name: 'lightnode1'
> Network id: 10
> Block gas limit: 0x67a09e29
2_deploy_contracts.js
=====================
Deploying 'AccessControl'
-------------------------
> transaction hash: 0xf49cca809ad273812de75225dcfe50b624bfe2a93fd2b44653491e8ee0edeb04
> Blocks: 1 Seconds: 4
> contract address: 0x05455fa63e5a7cb6575D75c99855cF3A1Adc72b1
> block number: 3160
> block timestamp: 0x5e02c15b
> account: 0x9A4aa696F85C6bF96733Cc5385cCaf2b7ee13f17
> balance: 0.00000000001
> gas used: 5263918
> gas price: 0 gwei
> value sent: 0 ETH
> total cost: 0 ETH
> Saving migration to chain.
> Saving artifacts
-------------------------------------
> Total cost: 0 ETH
Summary
=======
> Total deployments: 1
> Final cost: 0 ETH
|
3.5 合约交互
尝试了三种方式,在这里最后只有 truffle console 这种方式真正完成了,但理论上三种都可行,而且事实证明利用 web3.js 完成交互最方便,truffle console 还是有点繁琐。
truffle-contract
truffle使用 truffle-contract 接口(原文是contract abstraction,合约抽象)来交互,truffle develop的控制台、migrate写的部署脚本和基于 JS 的单元测试等都用的是这个抽象接口。
主要方式是编写JavaScript代码,使用提供的抽象接口可以调用已部署合约的函数,无论是发起交易改变合约状态还是仅仅调用获得返回结果。
在项目根目录(和trufffle-config.js同文件夹)创建文件JCRegister.js,用于注册判决合约,文件内容如下
1
2
3
4
5
6
7
8
9
10
11
12
13
14
15
16
17
18
19
20
| var Register = artifacts.require("Register");
var Judge = artifacts.require("Judge");
module.export = function(done) {
console.log("Getting deployed Register contract...")
Register.deployed().then(function(instance) {
console.log("Register Judge contract...");
return instance.contractRegister("Judger", "JC", "0xbffe4ff0cbd0a7590fb71966d1e6bb1a4c2359e0", Judge.address);
}).then(function(error, result) {
if(!error) {
console.log("Transaction:", result.tx);
console.log("Finished!");
}
else
console.log(error);
}).catch(function(e) {
console.log(e);
done();
});
};
|
解锁node0账户,然后执行下列命令
1
| truffle exec JCRegister.js
|
truffle exec执行错误,错误信息如下
1
2
3
4
5
6
7
8
9
| $ truffle exec JCRegister.js
Using network 'development'.
TypeError: fn is not a function
at Object.exec (/usr/local/lib/node_modules/truffle/build/webpack:/packages/require/require.js:124:1)
at /usr/local/lib/node_modules/truffle/build/webpack:/packages/core/lib/commands/exec.js:89:1
at processTicksAndRejections (internal/process/task_queues.js:93:5)
Truffle v5.1.5 (core: 5.1.5)
Node v12.14.0
|
web3.js
使用 web3.js,在用户根目录建立 web3 文件夹,本地安装 web3.js 模块
1
2
3
4
5
6
7
8
| $ cd ..
$ pwd
/home/shuzang
$ mkdir web3 && cd web3
$ npm install web3
$ npm list --depth 0
/home/shuzang/web3
└── web3@1.2.4
|
创建文件1_Register_JC.js用于注册判决合约,命名方式参考了 truffle 的命名方式文件内容如下,ABI 过长,本文以省略号代替。
 1
 2
 3
 4
 5
 6
 7
 8
 9
10
11
12
13
14
15
16
17
18
19
20
21
22
23
24
25
26
27
28
29
30
31
32
33
34
35
36
37
38
39
40
41
42
43
44
45
46
47
| var Web3 = require('web3');
if(typeof web3 !=='undefined'){ //检查是否已有web3实例
web3=new Web3(web3.currentProvider);
}else{
//否则就连接到给出节点
web3=new Web3();
web3.setProvider(new Web3.providers.WebsocketProvider("ws://localhost:8545"));
}
var rcAbi = [...]
web3.eth.getBlock(0, function(error, result){
if(!error)
console.log("connection succeed");
else
console.log("something wrong, connection failed");
});
var rcAddress = "0x8980FC2bBD25958d0c72F5ba5fa3e5faF1A48c05";
var jcAddress= "0x2C2Fb0DD2440e72318Fb018f923F78Ff86541D08";
var register = new web3.eth.Contract(rcAbi);
register.options.address=rcAddress;
register.methods.contractRegister("Judger", "JC", "0xbffe4ff0cbd0a7590fb71966d1e6bb1a4c2359e0", jcAddress).send({
from: "0xbffe4ff0cbd0a7590fb71966d1e6bb1a4c2359e0",
gas: 10000000
}, function (error, result){
if(!error){
console.log('Transaction: ' + result);
console.log('Finished!');
}
else
console.log(error);
})
register.methods.getContractAddr("Judger").call({
from: "0xbffe4ff0cbd0a7590fb71966d1e6bb1a4c2359e0",
gas: 10000000
}, function (error, result){
if(!error){
console.log('Judge contract address:' + result);
}
else
console.log(error);
})
|
web3.js执行合约交易不成功,全部陷在交易池了
1
2
3
4
5
| > txpool.status
{
pending: 5,
queued: 0
}
|
日志记录里提示
1
| VM returned with error err="evm: execution reverted"
|
truffle console
truffle的文档里提到与已部署的合约交互可以使用truffle console,故尝试
首先注册判决合约,需要在node0中进行,进入development网络
命令执行完毕后进入truffle console控制台,注册合约并查询合约地址进行验证
1
2
3
4
| truffle(development)> Register.deployed().then(function(instance) {instance.contractRegister("Judger", "JC", "0xbffe4ff0cbd0a7590fb71966d1e6bb1a4c2359e0", Judge.address);})
undefined
truffle(development)> Register.deployed().then(function(instance) {return instance.getContractAddr("Judger");})
'0x2C2Fb0DD2440e72318Fb018f923F78Ff86541D08'
|
退出重新执行truffle console命令,进入lightnode2网络
1
2
| truffle(development)> .exit
$ truffle console --network lightnode2
|
进入lightnode2的truffle console控制台,注册设备相关属性,然后查询属性进行验证
1
2
3
4
5
6
7
8
| truffle(lightnode2)> let instance = await Register.deployed()
undefined
truffle(lightnode2)> instance.subjectRegister("0x016b71d115f1da36de58d2b78369fd3228bef3dd", "0xa31d40508da63fb00d7e2f4db57c3774384aa299", "thermostat", "subject")
...
truffle(lightnode2)> instance.getAttribute("0x016b71d115f1da36de58d2b78369fd3228bef3dd", "deviceType")
'thermostat'
truffle(lightnode2)> instance.getAttribute("0x016b71d115f1da36de58d2b78369fd3228bef3dd", "deviceRole")
'subject'
|
退出lightnode2的控制台,进入lightnode1的控制台
1
2
| truffle(lightnode2)> .exit
$ truffle console --network lightnode1
|
首先在RC中注册ACC
1
2
3
4
| truffle(lightnode1)> Register.deployed().then(function(instance) {instance.contractRegister("Temperature_Sensor1", "ACC", "0x9a4aa696f85c6bf96733cc5385ccaf2b7ee13f17", AccessControl.address);})
undefined
truffle(lightnode1)> Register.deployed().then(function(instance) {return instance.getContractAddr("Temperature_Sensor1");})
'0x05455fa63e5a7cb6575D75c99855cF3A1Adc72b1'
|
然后在ACC中注册资源属性,并查询属性进行验证
1
2
3
4
5
| truffle(lightnode1)> let instance = await AccessControl.deployed()
undefined
truffle(lightnode1)> instance.resourceAttrAdd("data", "currentTemperature", "23")
truffle(lightnode1)> instance.getResourceAttr("data", "currentTemperature")
'23'
|
接下来针对已注册的属性,在ACC中设置访问控制策略,并查询策略进行验证
1
2
3
4
5
6
7
8
9
10
11
12
| truffle(lightnode1)> instance.policyAdd("data", "read", "subject", "deviceType", "=", "thermostat")
truffle(lightnode1)> instance.getPolicy("data", "read", "deviceType")
Result {
'0': 'subject',
'1': 'deviceType',
'2': '=',
'3': 'thermostat',
_attrOwner: 'subject',
_attrName_: 'deviceType',
_operator: '=',
_attrValue: 'thermostat'
}
|
最后发起访问控制请求和监听依然使用web3.js完成,切换到web3目录下,首先新建test.js测试是否可使用,测试脚本内容如下
 1
 2
 3
 4
 5
 6
 7
 8
 9
10
11
12
13
14
15
16
17
18
19
20
21
22
23
24
25
26
27
28
29
30
31
32
33
34
35
36
37
38
39
40
41
42
| var Web3 = require('web3');
if(typeof web3 !=='undefined'){ //检查是否已有web3实例
web3=new Web3(web3.currentProvider);
}else{
//否则就连接到给出节点
web3=new Web3();
web3.setProvider(new Web3.providers.WebsocketProvider("ws://localhost:8545"));
};
var connect = function() {
web3.eth.getBlock(0, function(error, result){
if(!error)
console.log("connection succeed");
else
console.log("something wrong, connection failed");
});
}
var getAccount = async function() {
await connect();
var account0;
web3.eth.getAccounts(function(error, result){
if(!error){
account0=result[0];
//console.log(account0);
console.log("accounts:"+result);
}
else{
console.log("failed to get Accoutns");
}
});
}
getAccount().then(function() {
web3.eth.getBalance("0xbffe4ff0cbd0a7590fb71966d1e6bb1a4c2359e0").then(function(balance) {
console.log('balance:',balance);
console.log("test passed!");
})
})
|
测试结果如下,说明没有问题
1
2
3
4
5
| $ node test.js
connection succeed
accounts:0xbfFe4ff0cBd0A7590Fb71966D1E6bb1a4c2359e0
balance: 99999999999999999999999999999998000000000000000000
test passed!
|
在 web3 目录下新建requester.js文件和monitor.js文件,前者用来发起访问控制请求,后者用来监听访问控制触发的事件
requester.js的内容如下,通过 websocket 连接 lightnode2,发起访问控制请求
1
2
3
4
5
6
7
8
9
10
11
12
13
14
15
16
17
18
19
20
21
22
23
24
25
26
27
28
29
30
31
32
33
34
35
36
37
38
39
40
41
42
43
44
45
46
47
48
49
50
51
52
53
54
55
56
57
58
59
60
61
62
63
| var Web3 = require('web3');
var readline = require('readline');
var web3 = new Web3(Web3.givenProvider || "ws://192.168.191.4:8545");
var accAbi = [...];
var accAddr = "0xb29094a4DE9c2E22b598b39fE38860b9117340A6"
var myACC = new web3.eth.Contract(accAbi, accAddr);
var previousTxHash = 0;
var currentTxHash = 0;
var rl = readline.createInterface({
input: process.stdin,
output: process.stdout,
prompt: 'Send access request?(y/n)'
});
rl.prompt();
rl.on('line',(answer) => {
if('y' == answer) {
myACC.methods.accessControl("data", "read").send({
from: "0xbd93271c5d2ccacdc307d1825614d5557ad6e0fd",
gas: 10000000,
gasPrice: 0
},function(error,result){
if(!error){
currentTxHash = result
console.log("currentTxHash: ", result)
}
})
myACC.events.ReturnAccessResult({
fromBlock: 0
}, function(error, result){
if(!error) {
if(previousTxHash != result.transactionHash && currentTxHash == result.transactionHash) {
console.log("Contract: "+result.address);
console.log("Block Number: "+result.blockNumber);
console.log("Tx Hash: "+result.transactionHash);
console.log("Block Hash: "+result.blockHash);
console.log("Time: "+result.returnValues._time);
console.log("Message: "+result.returnValues._errmsg);
console.log("Result: "+result.returnValues._result);
if (result.returnValues._penalty > 0) {
console.log("Requests are blocked for " + result.returnValues._penalty +"seconds!")
}
console.log('\n');
previousTxHash = result.transactionHash;
rl.prompt();
}
}
})
}
else{
console.log("access request doesn't send!")
rl.prompt();
}
}).on('close',() =>{
console.log('All actions had executed!');
process.exit(0);
});
|
monitor.js的内容如下,由 lightnode1 发起,用于监听返回的事件
1
2
3
4
5
6
7
8
9
10
11
12
13
14
15
16
17
18
19
20
21
22
23
24
| var Web3 = require('web3');
var web3 = new Web3(Web3.givenProvider || "ws://192.168.191.3:8545");
var accAbi = [...];
var accAddr = "0xb29094a4DE9c2E22b598b39fE38860b9117340A6";
var myACC = new web3.eth.Contract(accAbi, accAddr);
myACC.events.ReturnAccessResult({
fromBlock: 0
}, function(error, result){
if(!error) {
console.log("Contract: "+result.address);
console.log("Block Number: "+result.blockNumber);
console.log("Tx Hash: "+result.transactionHash);
console.log("Block Hash: "+result.blockHash);
console.log("Time: "+result.returnValues._time);
console.log("Message: "+result.returnValues._errmsg);
console.log("Result: "+result.returnValues._result);
if (result.returnValues._penalty > 0) {
console.log("Requests are blocked for " + result.returnValues._penalty +"seconds!")
}
console.log('\n');
}
})
|
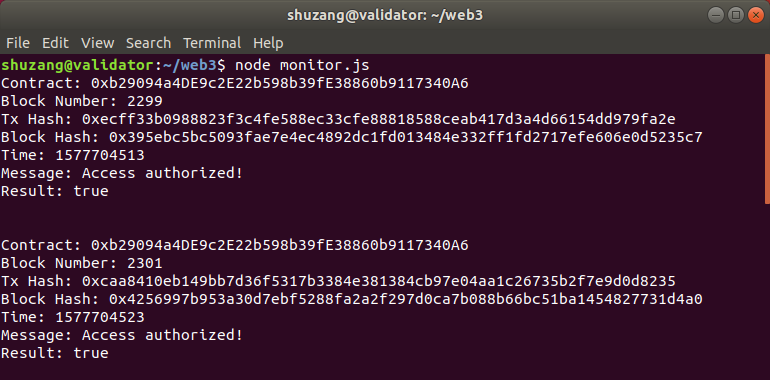
实验结果如下


3.6 错误测试
之前的实验验证的是访问权限被授予的情况,现在测试被拒绝的情况
在 lightnode2 建立新的IoT设备账户,这次代表摄像头(Camera),
1
2
3
4
5
6
7
8
9
10
11
12
13
14
| > personal.newAccount()
Passphrase:
Repeat passphrase:
"0x42b97b26ed5f53693bcc9b58ad8c724718ea0a15"
> personal.listAccounts
["0xa31d40508da63fb00d7e2f4db57c3774384aa299", "0x016b71d115f1da36de58d2b78369fd3228bef3dd", "0x42b97b26ed5f53693bcc9b58ad8c724718ea0a15"]
> personal.unlockAccount(eth.accounts[0])
Unlock account 0xa31d40508da63fb00d7e2f4db57c3774384aa299
Passphrase:
true
> eth.sendTransaction({from:eth.accounts[0],to:eth.accounts[2],value:1*1e7})
"0x9f36de89d44db23e63e4fa0d3135d1c17e800cca73f0661ae276f20c0e3d1902"
> eth.getBalance(eth.accounts[2])
10000000
|
修改truffle-config.js文件中 lightnode2 网络的执行账户为新建立的账户
1
2
3
4
5
6
7
8
9
10
| ...
lightnode2: {
host: "192.168.191.4",
port: 22000, // Standard Ethereum port (default: none)
network_id: "10",
gasPrice: 0,
gas: 10000000,
type: "quorum",
from: "0x42b97b26ed5f53693bcc9b58ad8c724718ea0a15",
...
|
进入lightnode2的 truffle console
1
2
| cd AC
truffle console --network lightnode2
|
注册新设备的属性
1
2
3
4
5
6
| truffle(lightnode2)> Register.deployed().then(function(instance) {instance.subjectRegister("0x42b97b26ed5f53693bcc9b58ad8c724718ea0a15","0xa31d40508da63fb00d7e2f4db57c3774384aa299", "camera", "subject");})
undefined
truffle(lightnode2)> Register.deployed().then(function(instance) {instance.getAttribute("0x42b97b26ed5f53693bcc9b58ad8c724718ea0a15","deviceType");})
'camera'
truffle(lightnode2)> Register.deployed().then(function(instance) {instance.getAttribute("0x42b97b26ed5f53693bcc9b58ad8c724718ea0a15","deviceRole");})
'subject'
|
建立requester2.js,内容和requester.js相似,只是发起访问控制的是lightnode2新建立的camera设备账户,也就是说与requester.js的不同仅在于发起访问控制的账户
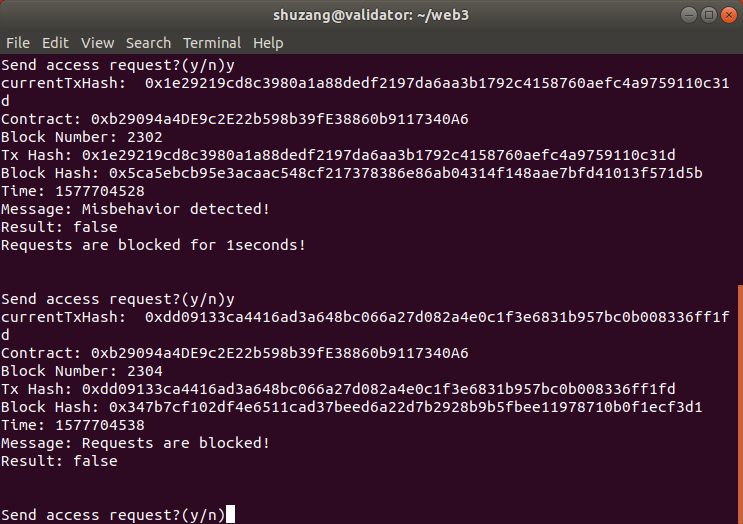
错误测试的结果如下


3.7 步骤总结
总结一下本篇中需要做的事情
- node0 部署RC,获取RC合约地址
- node0 部署JC,传入参数base=2、interval=3,获取JC的合约地址
- JC 合约在RC中注册
- node0 分别转给lightnode1和lightnode2 1 ether
- lightnode1 新建IoT设备账户,从第一个账户向该账户转入1000 0000wei
- lightnode2 新建两个IoT设备账户,从第一个账户分别向这两个账户转入1000 0000wei
- lightnode2 的两个IoT设备账户在RC中注册设备属性(事实上所有节点都应注册设备属性,这里是因为实验只需要它们两个发起访问控制)
- lightnode1 的IoT设备账户部署ACC,传入RC和JC的合约地址,获取ACC的合约地址
- lightnode1 在RC中注册ACC
- lightnode1 在ACC中注册资源属性,设置访问控制策略
- lingtnode2 的两个IoT设备通过调用ACC向lightnode1的IoT设备发起访问控制
 支付宝
支付宝 微信
微信